Welcome to an in-depth exploration of the Fareye system, a powerful technology solution designed to streamline and optimize logistics operations. This guide is based on extensive hands-on training with the Fareye driver pilot system, covering everything from initial device setup and loading consignments to scanning packages and managing deliveries and pickups. Whether you're a driver new to Fareye or a logistics manager seeking to understand the system’s intricacies, this article will walk you through every step with clear instructions, practical tips, and insights to help you get the most out of this innovative platform.
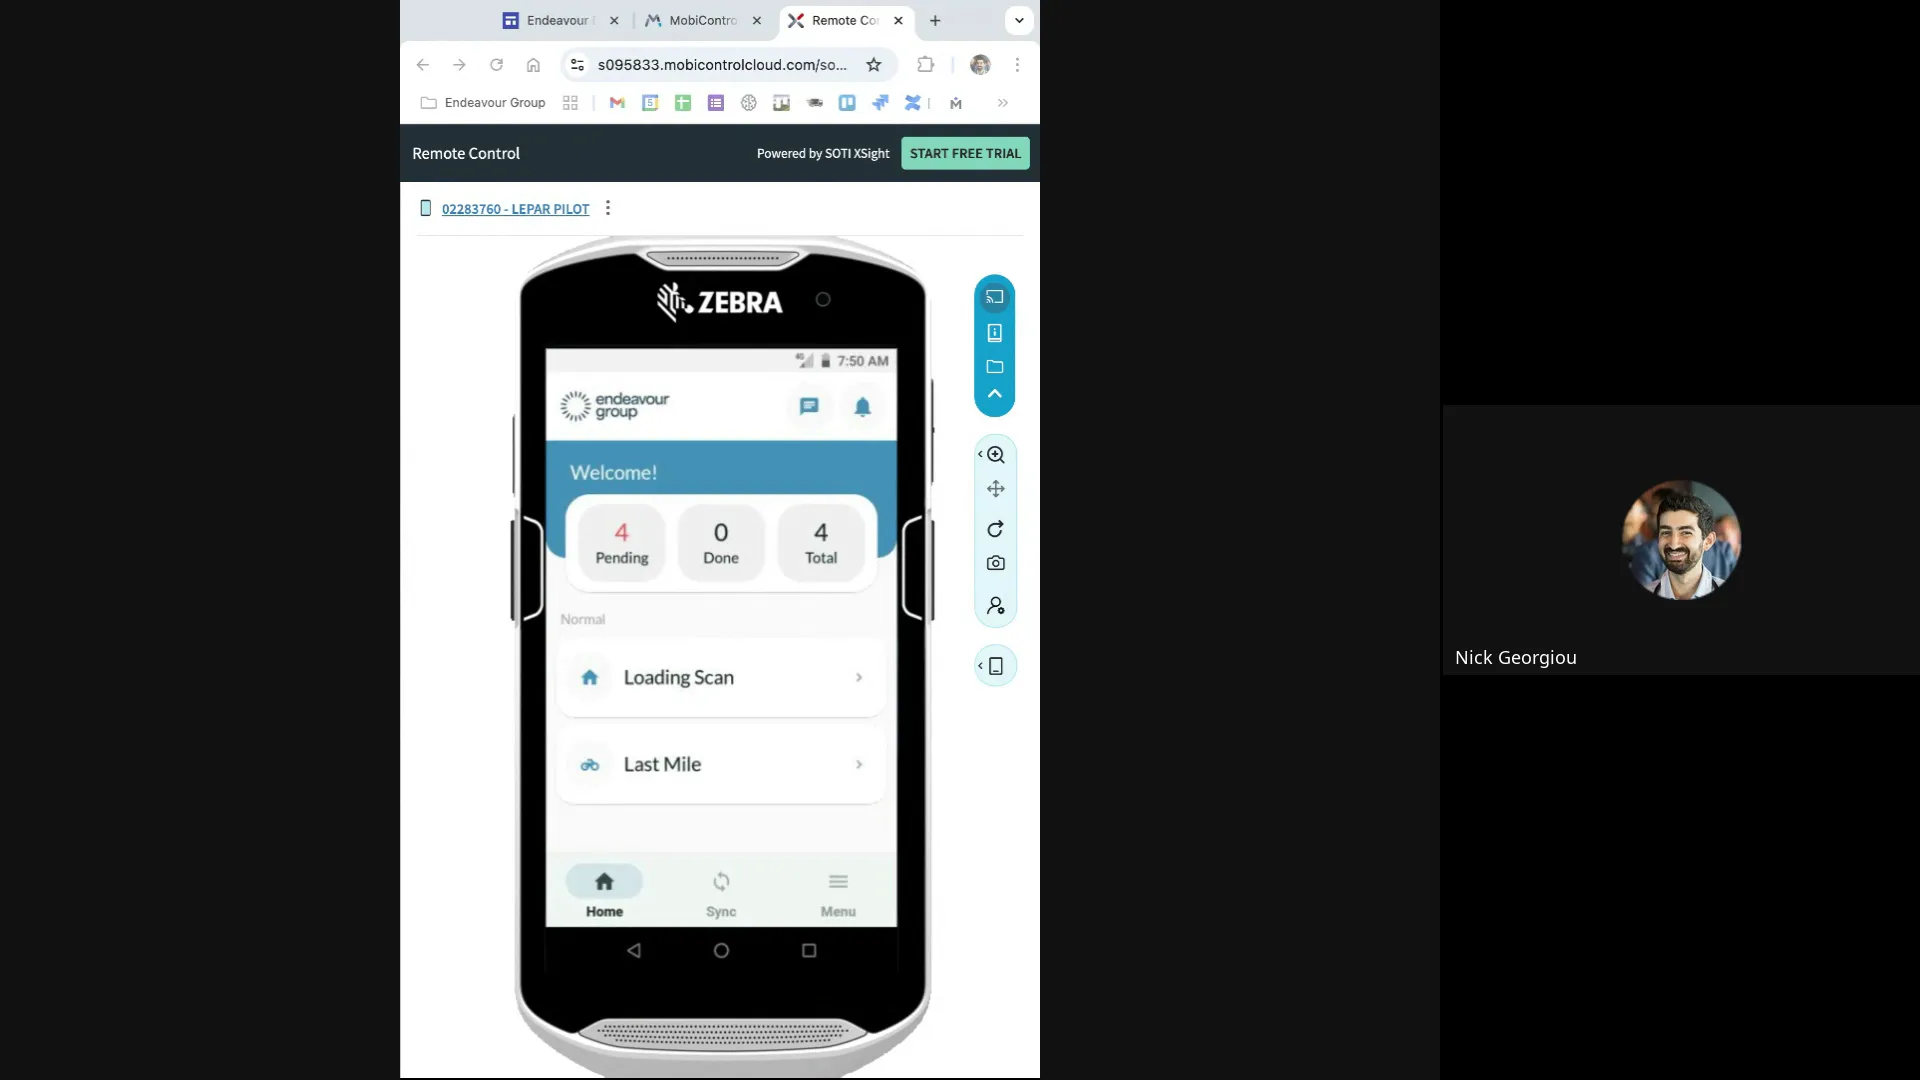
Table of Contents
- Introduction to Fareye and Device Setup
- Navigating the Fareye App: Loading and Last Mile Tabs
- Scanning Consignments: Ensuring Accuracy and Accountability
- Completing the Loading Process
- Managing Deliveries in the Last Mile Tab
- Pickup Process: Confirming and Handling Failures
- Ending Your Trip and Finalizing the Day
- Best Practices and Common Challenges
- Frequently Asked Questions (FAQ)
- Conclusion
Introduction to Fareye and Device Setup
Fareye is a comprehensive logistics management platform designed to enhance delivery and pickup workflows through real-time tracking, scanning, and status updates. Before diving into daily operations, it’s crucial to properly set up your Fareye scanning device. This setup is a one-time process that ensures your device is correctly configured for your country and linked to your account.
Initial Device Configuration
When you first power on the Fareye scanner, you’ll be greeted with a login screen within the app. The first step is to long-press the scanner button until a country selection menu appears. Select Australia to configure the device for your region. This step only needs to be done once, and after that, you won’t have to worry about it again.
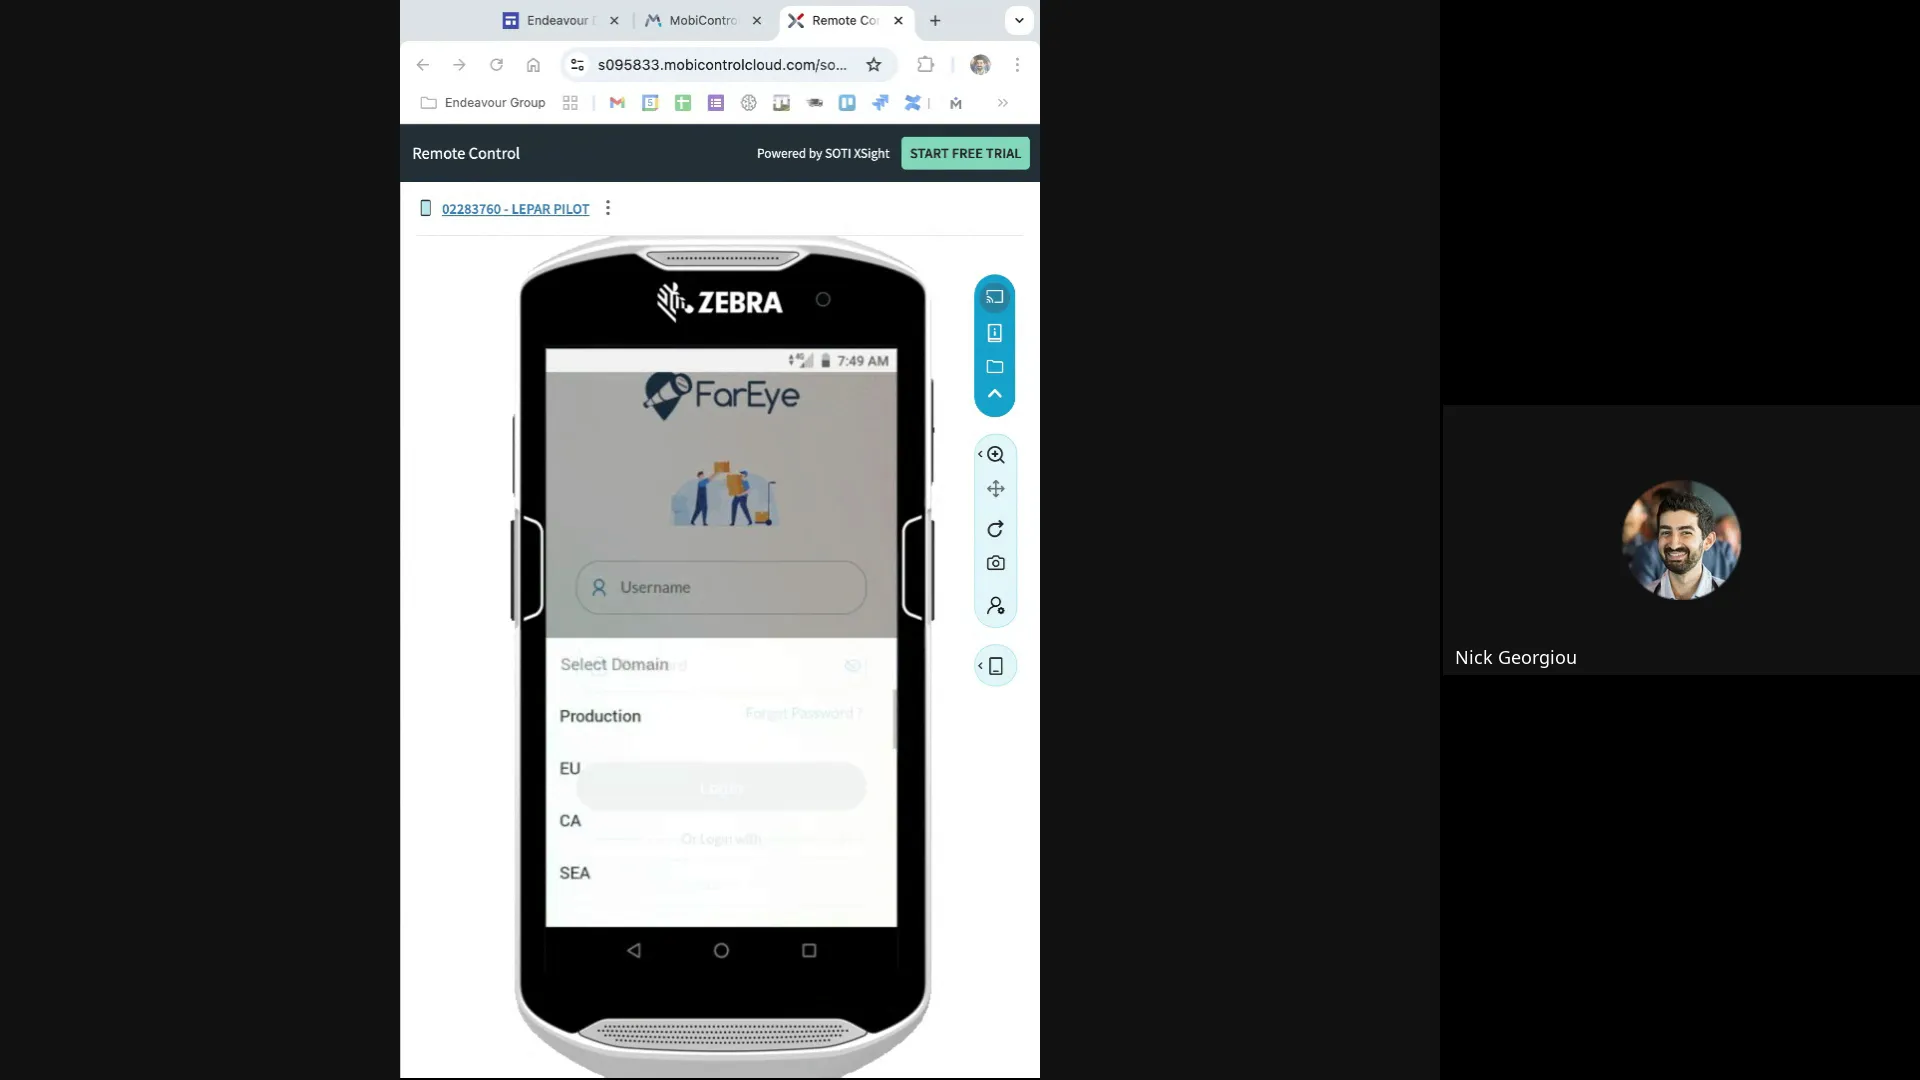
Once the country is selected, you will receive a QR code for login. Simply press the scanner button to activate the scanning function and scan the QR code provided. This method logs you into the system without the need to manually enter your username or password, making the process quick and seamless. You can even take a photo of the QR code for easy access in the future, as it will always work for logging in.
After logging in, the app will request permission to track the device’s location. It’s important to grant this permission to allow Fareye to accurately monitor your deliveries and pickups in real time.
Navigating the Fareye App: Loading and Last Mile Tabs
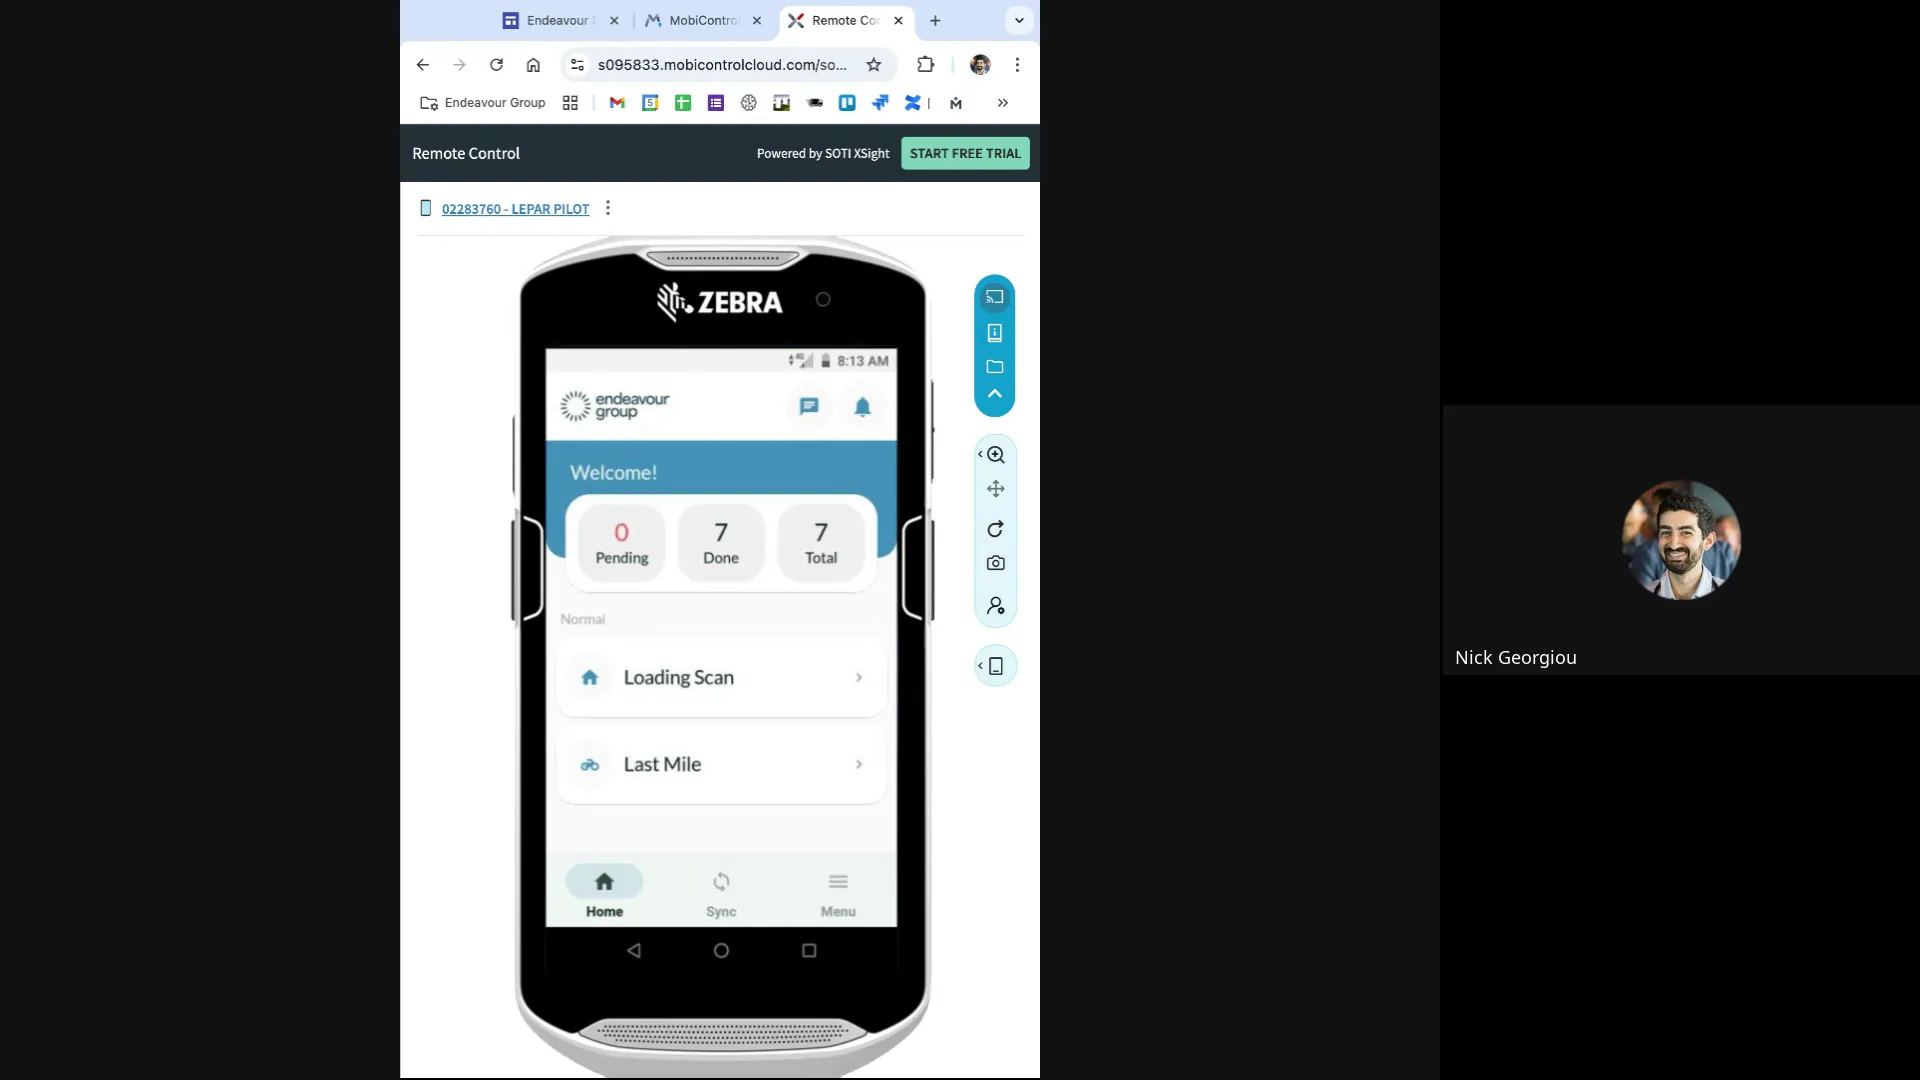
Upon successful login, the Fareye app presents two primary tabs: Loading and Last Mile. These tabs represent the core functions of the system, separating the preparatory loading process from the actual delivery execution.
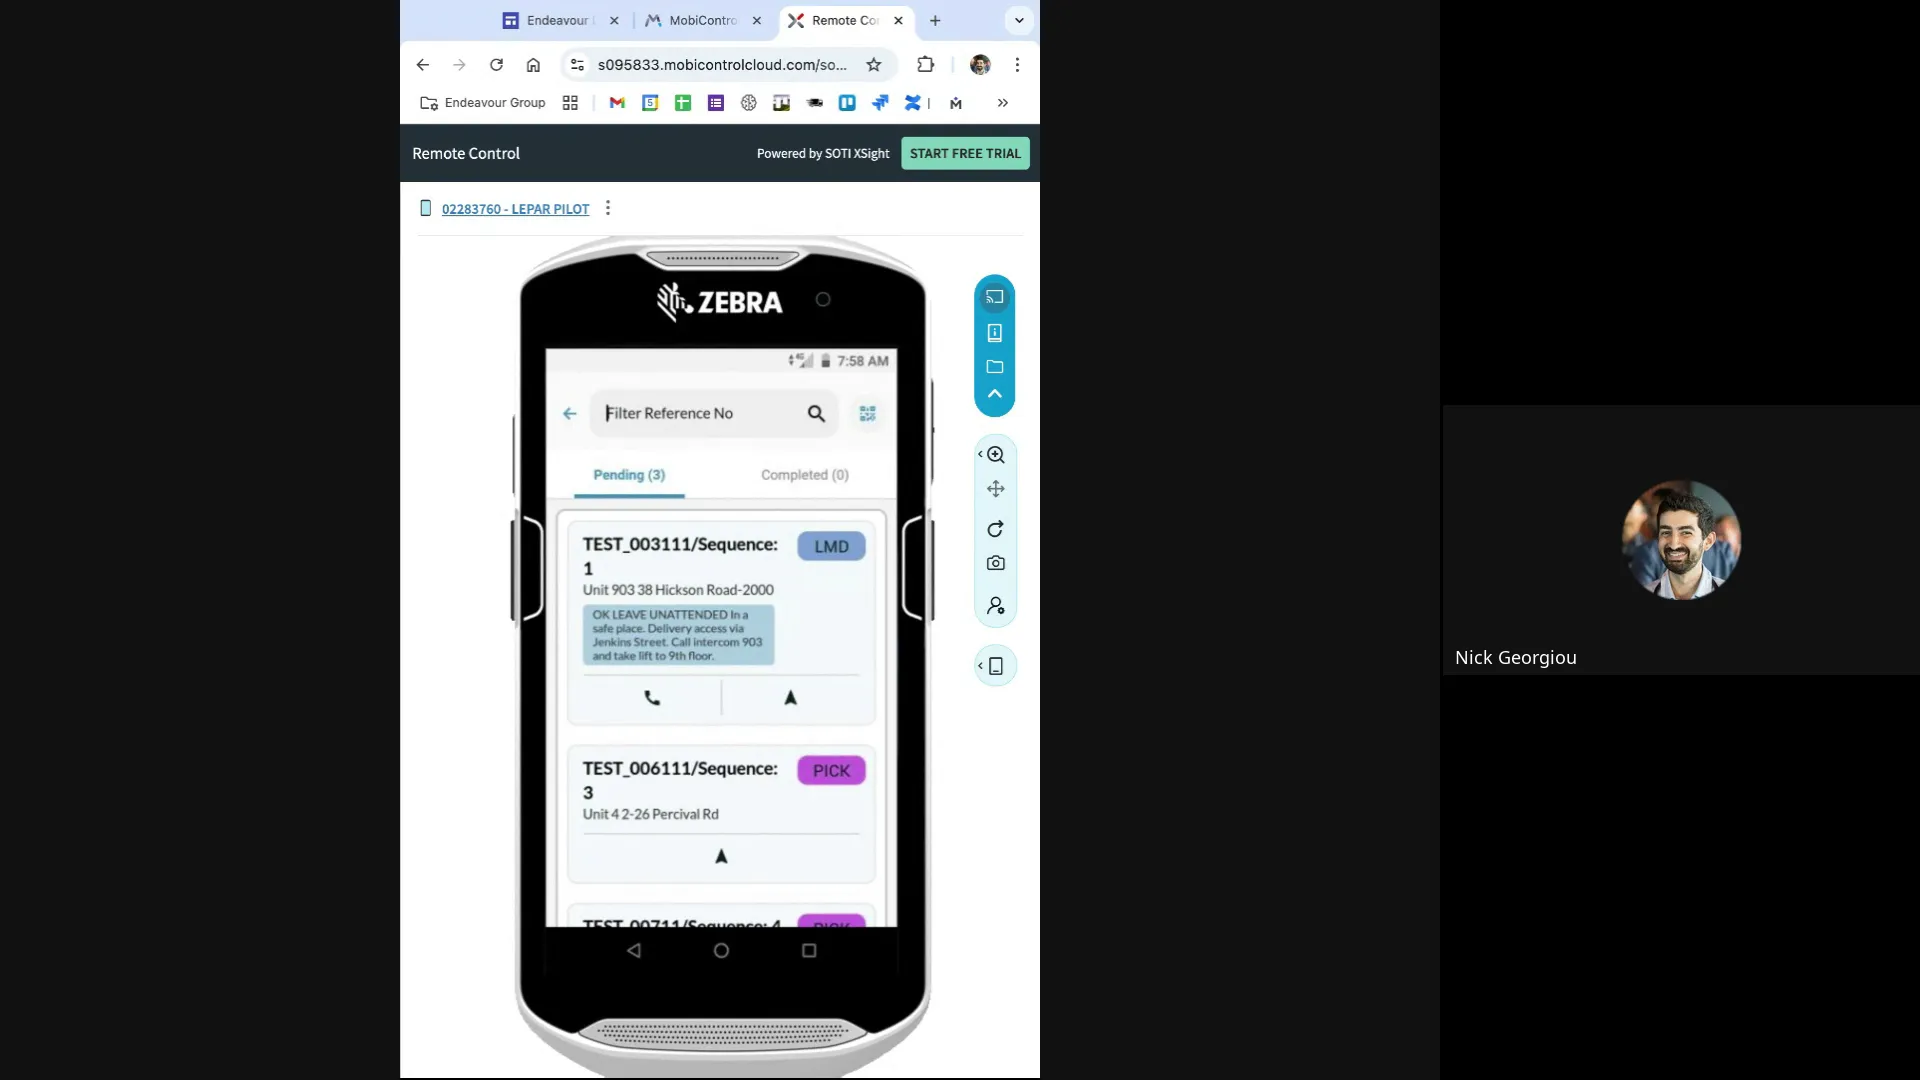
The Loading Tab: Organizing Your Consignments
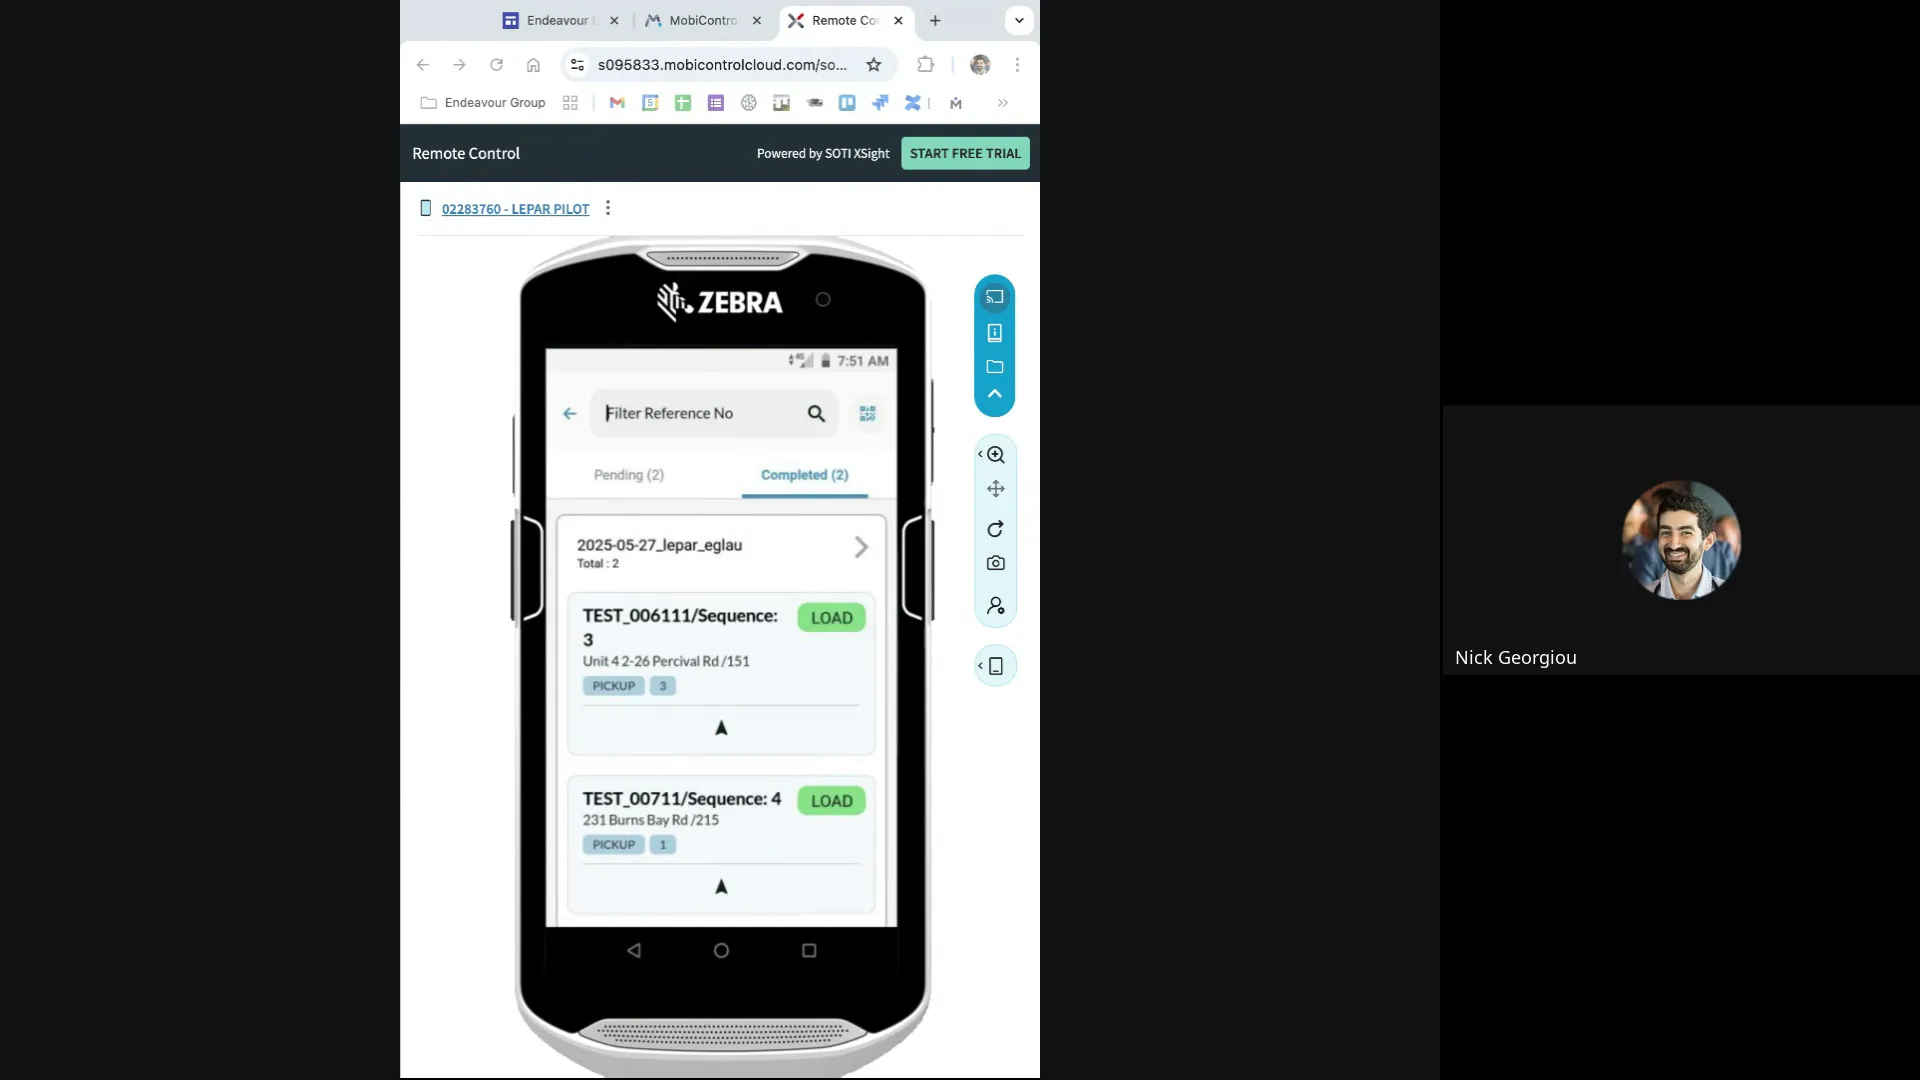
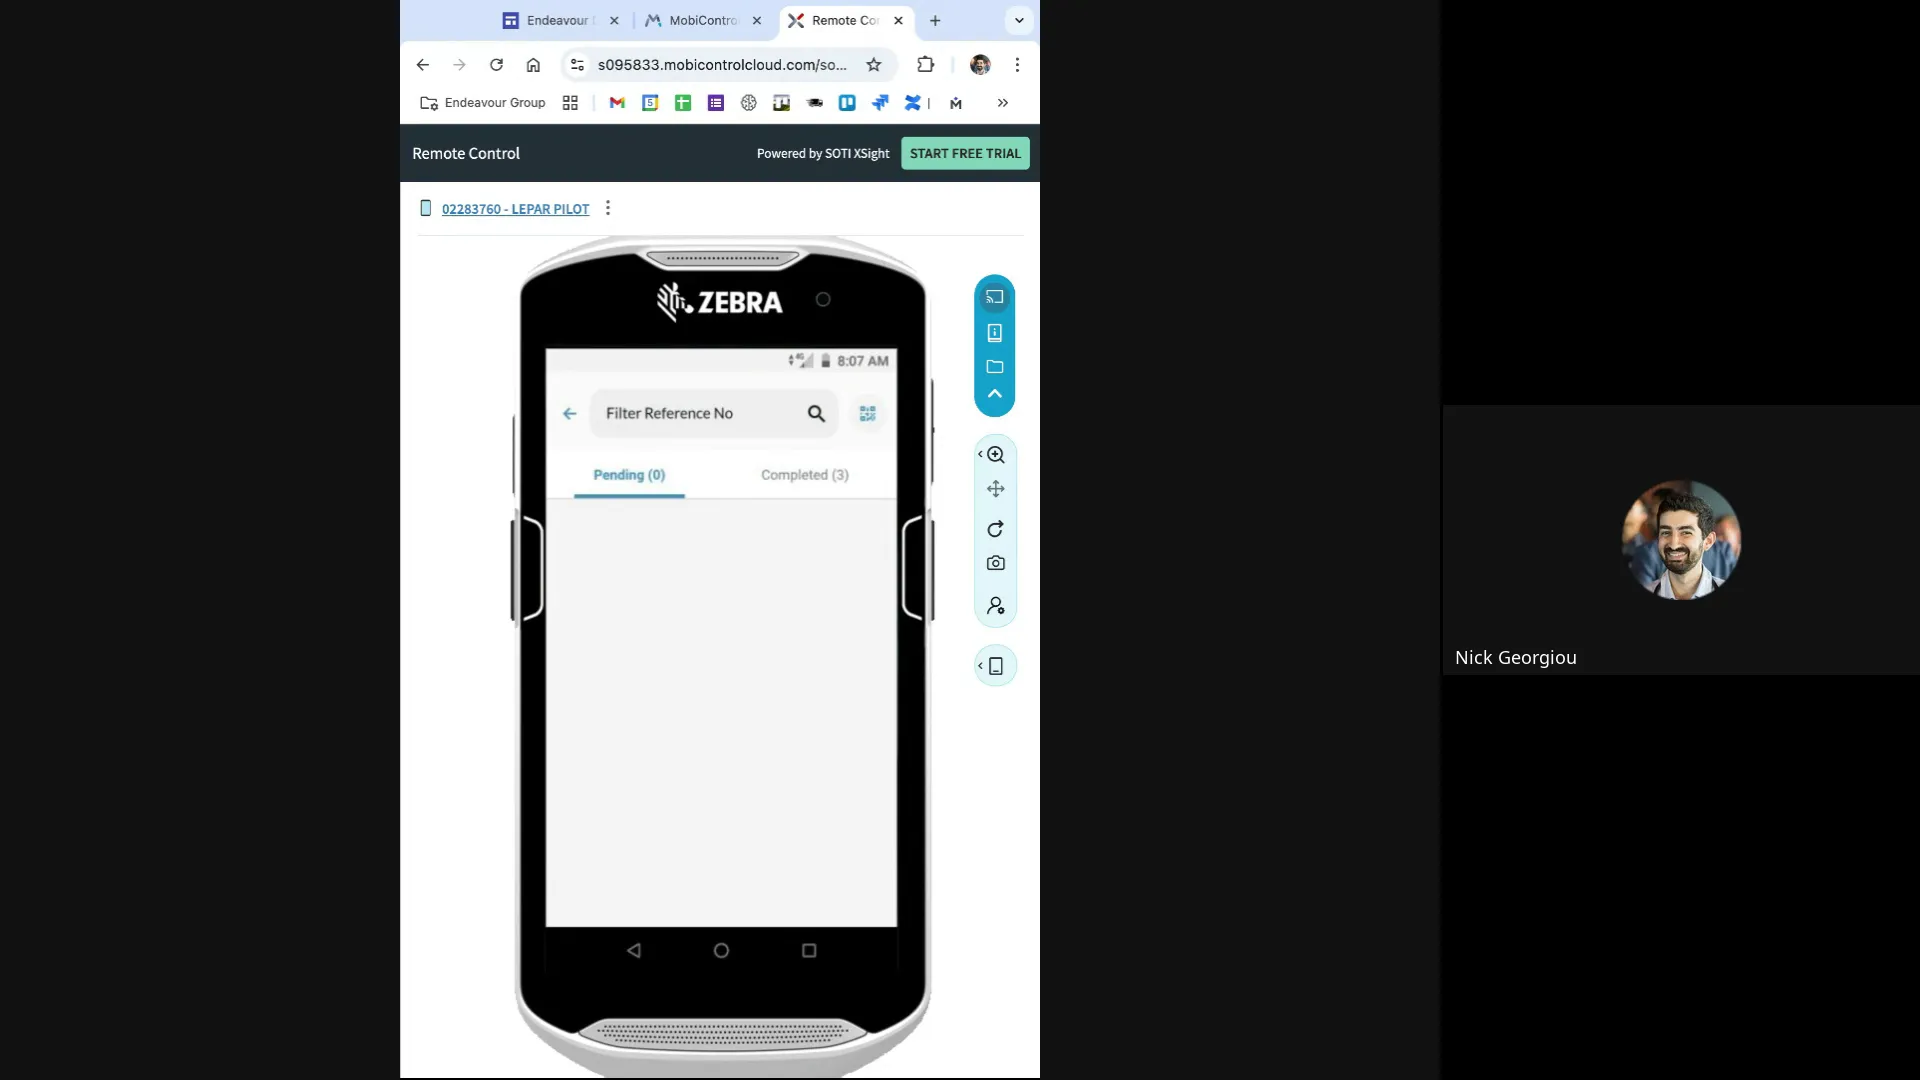
Every morning, your first task is to visit the Loading tab. Here, you will find the entire list of consignments that need to be loaded onto your vehicle for the day’s deliveries. The consignments are divided into two categories: Pending and Completed.
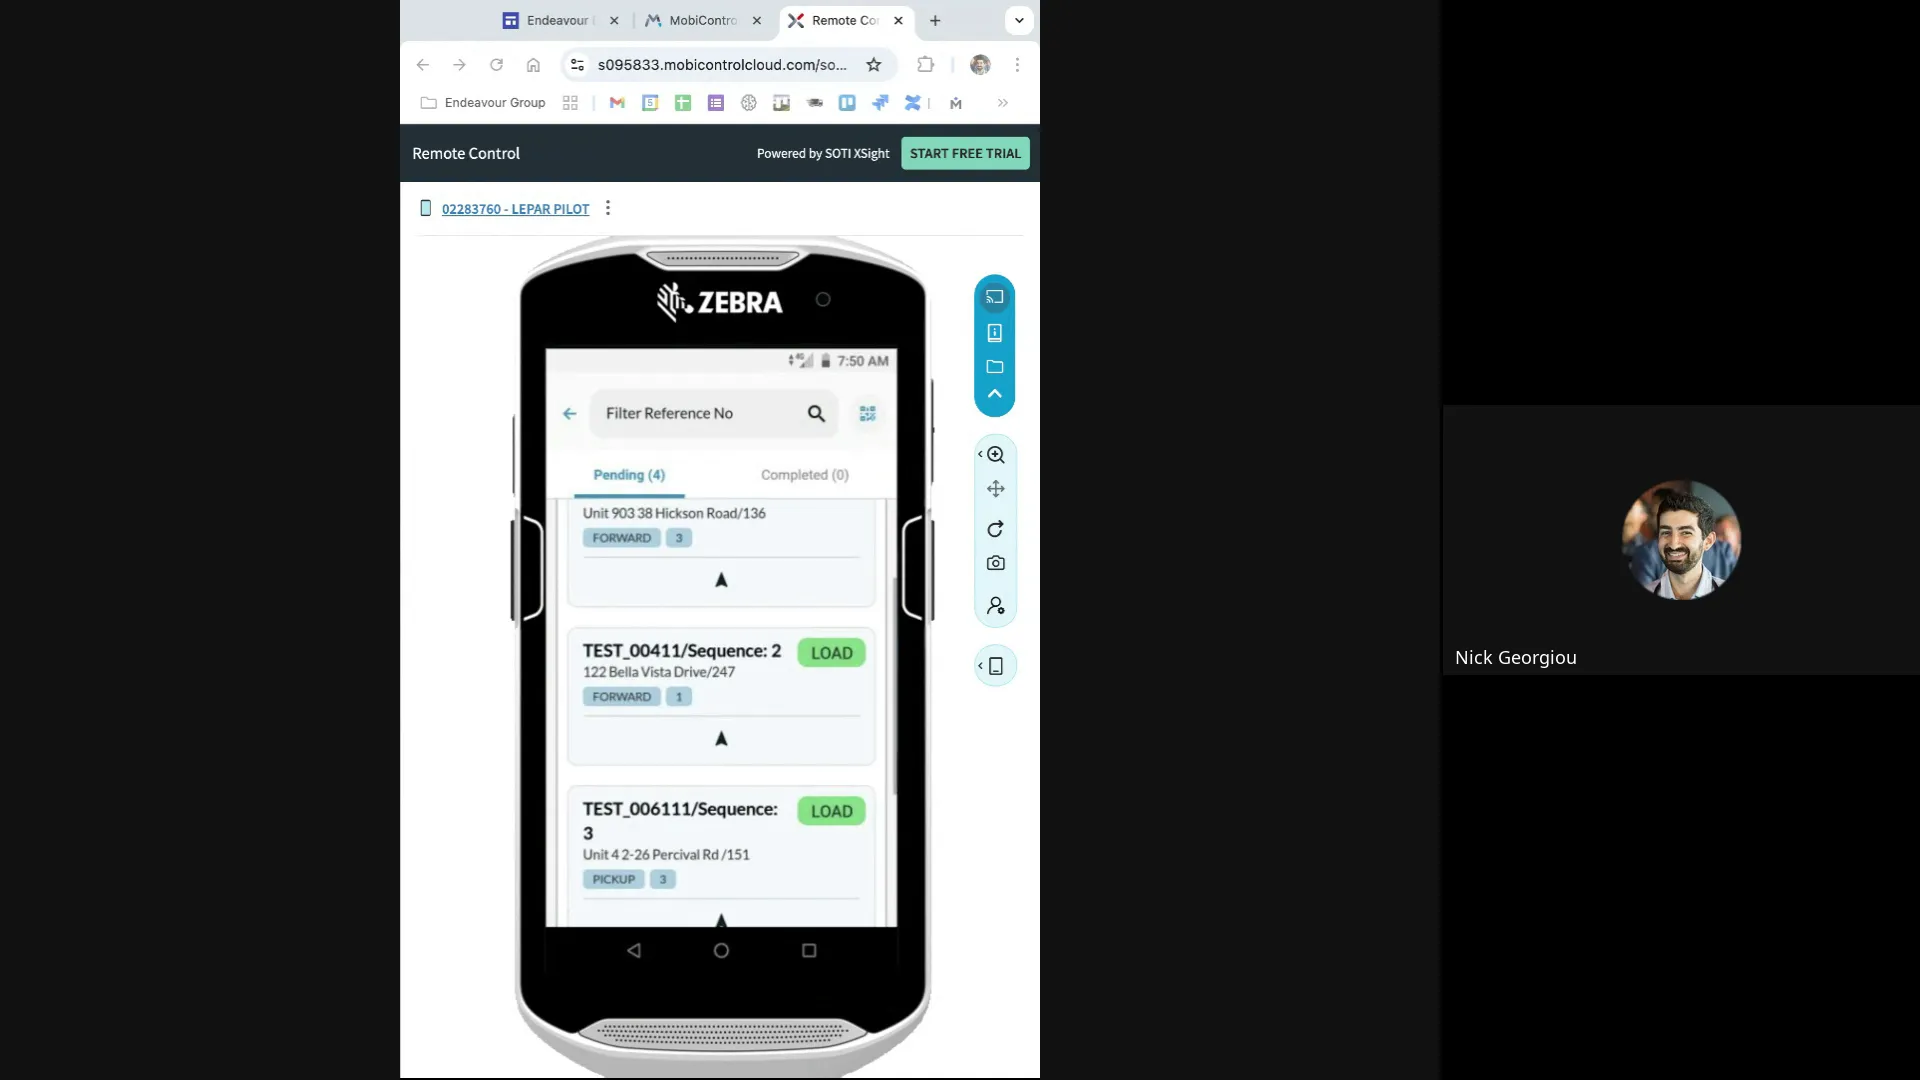
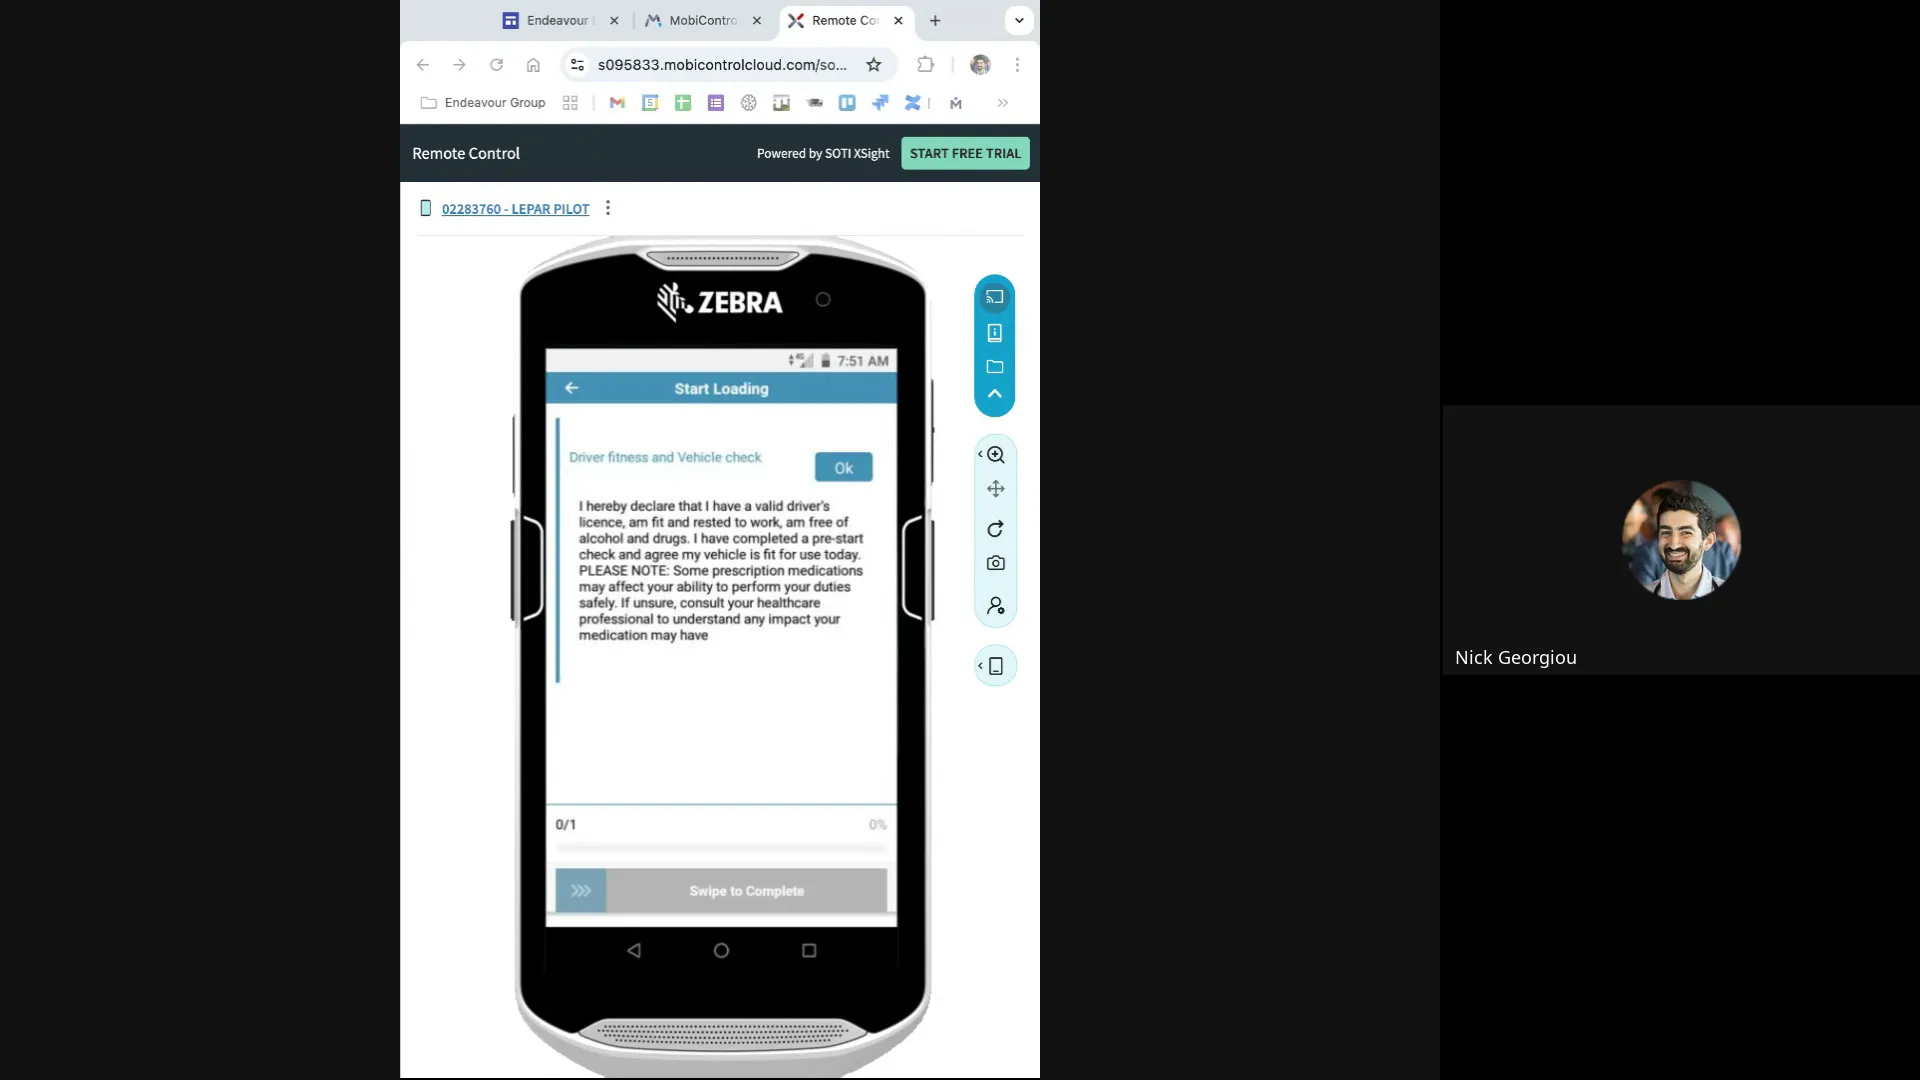
At the start of the day, all consignments appear as pending. You begin the loading process by pressing the Start Loading button, which triggers a vehicle check disclaimer. After confirming the vehicle check, the loading session officially begins.
One key feature to note is that all pickup consignments automatically move to the completed status once loading starts. This automation helps reduce manual steps and keeps your workflow efficient. However, delivery consignments remain pending until you scan and load each carton.
Understanding Consignment Details
Each consignment card in the Loading tab provides detailed information to guide your loading process, including:
- Consignment Number: This indicates the sequence in which you should load the consignments.
- Address: The delivery or pickup location.
- Territory: The area code or loading zone.
- Type: Indicates whether the consignment is a pickup or delivery.
- Number of Cartons: The total number of cartons to be loaded.
For example, if a consignment shows three cartons and another shows one, your job is to scan all four cartons during loading.
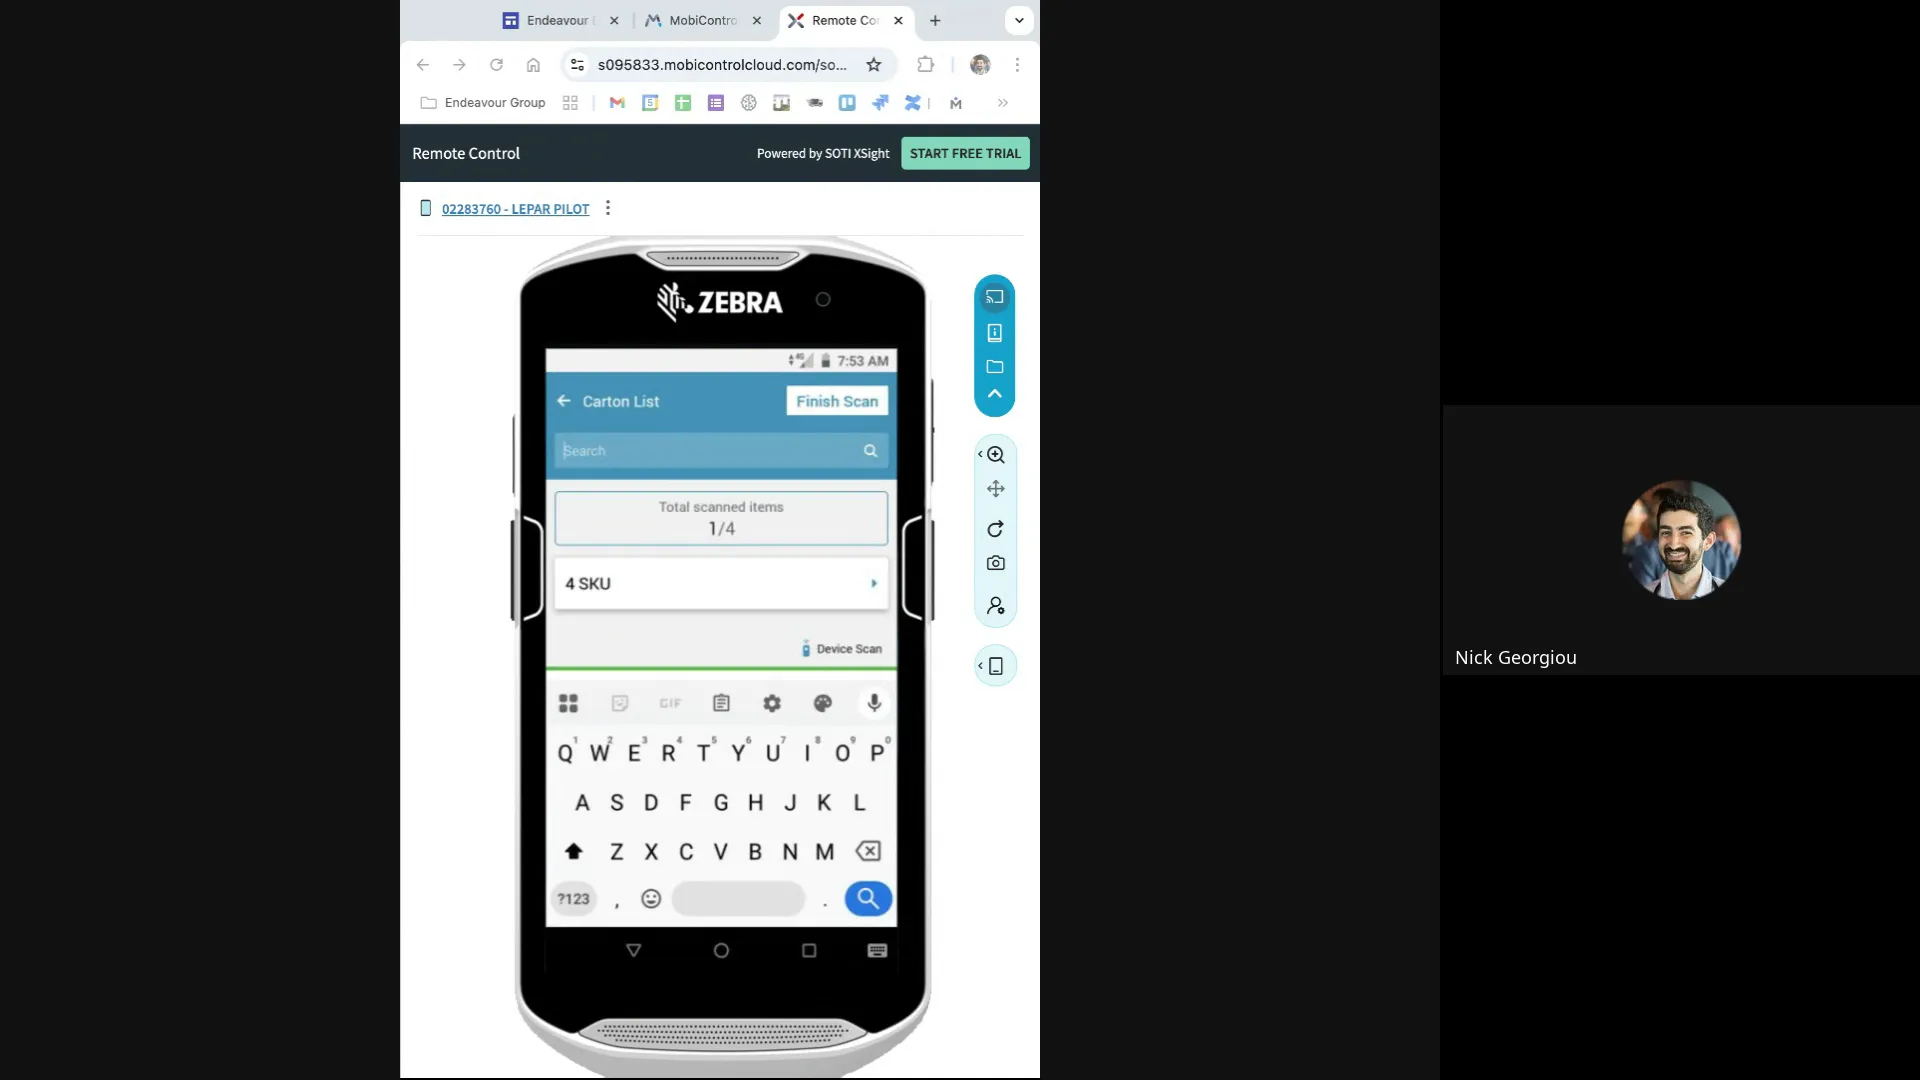
Scanning Consignments: Ensuring Accuracy and Accountability
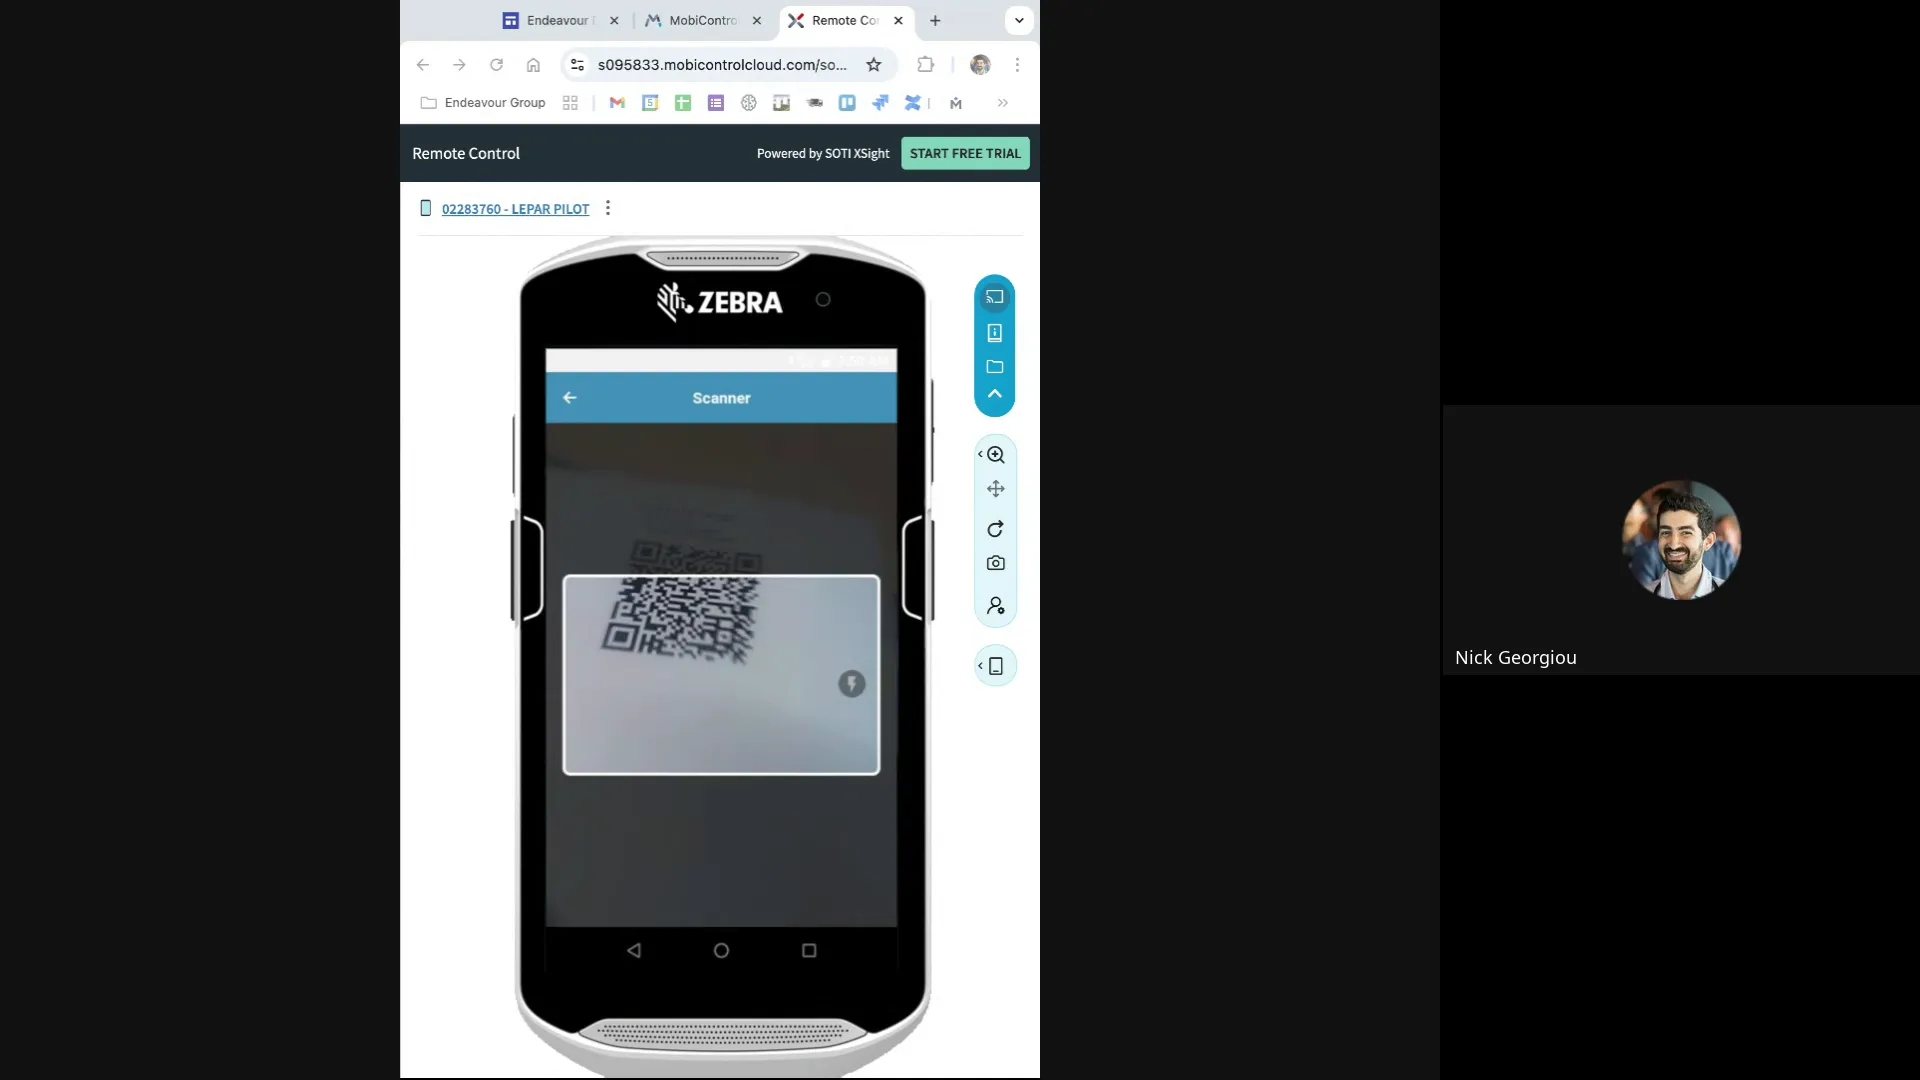
The scanning process is central to Fareye’s accuracy in tracking packages. After initiating loading, you proceed to the scanner interface by pressing the arrow button, which takes you to a list of all consignments and cartons that need to be scanned.
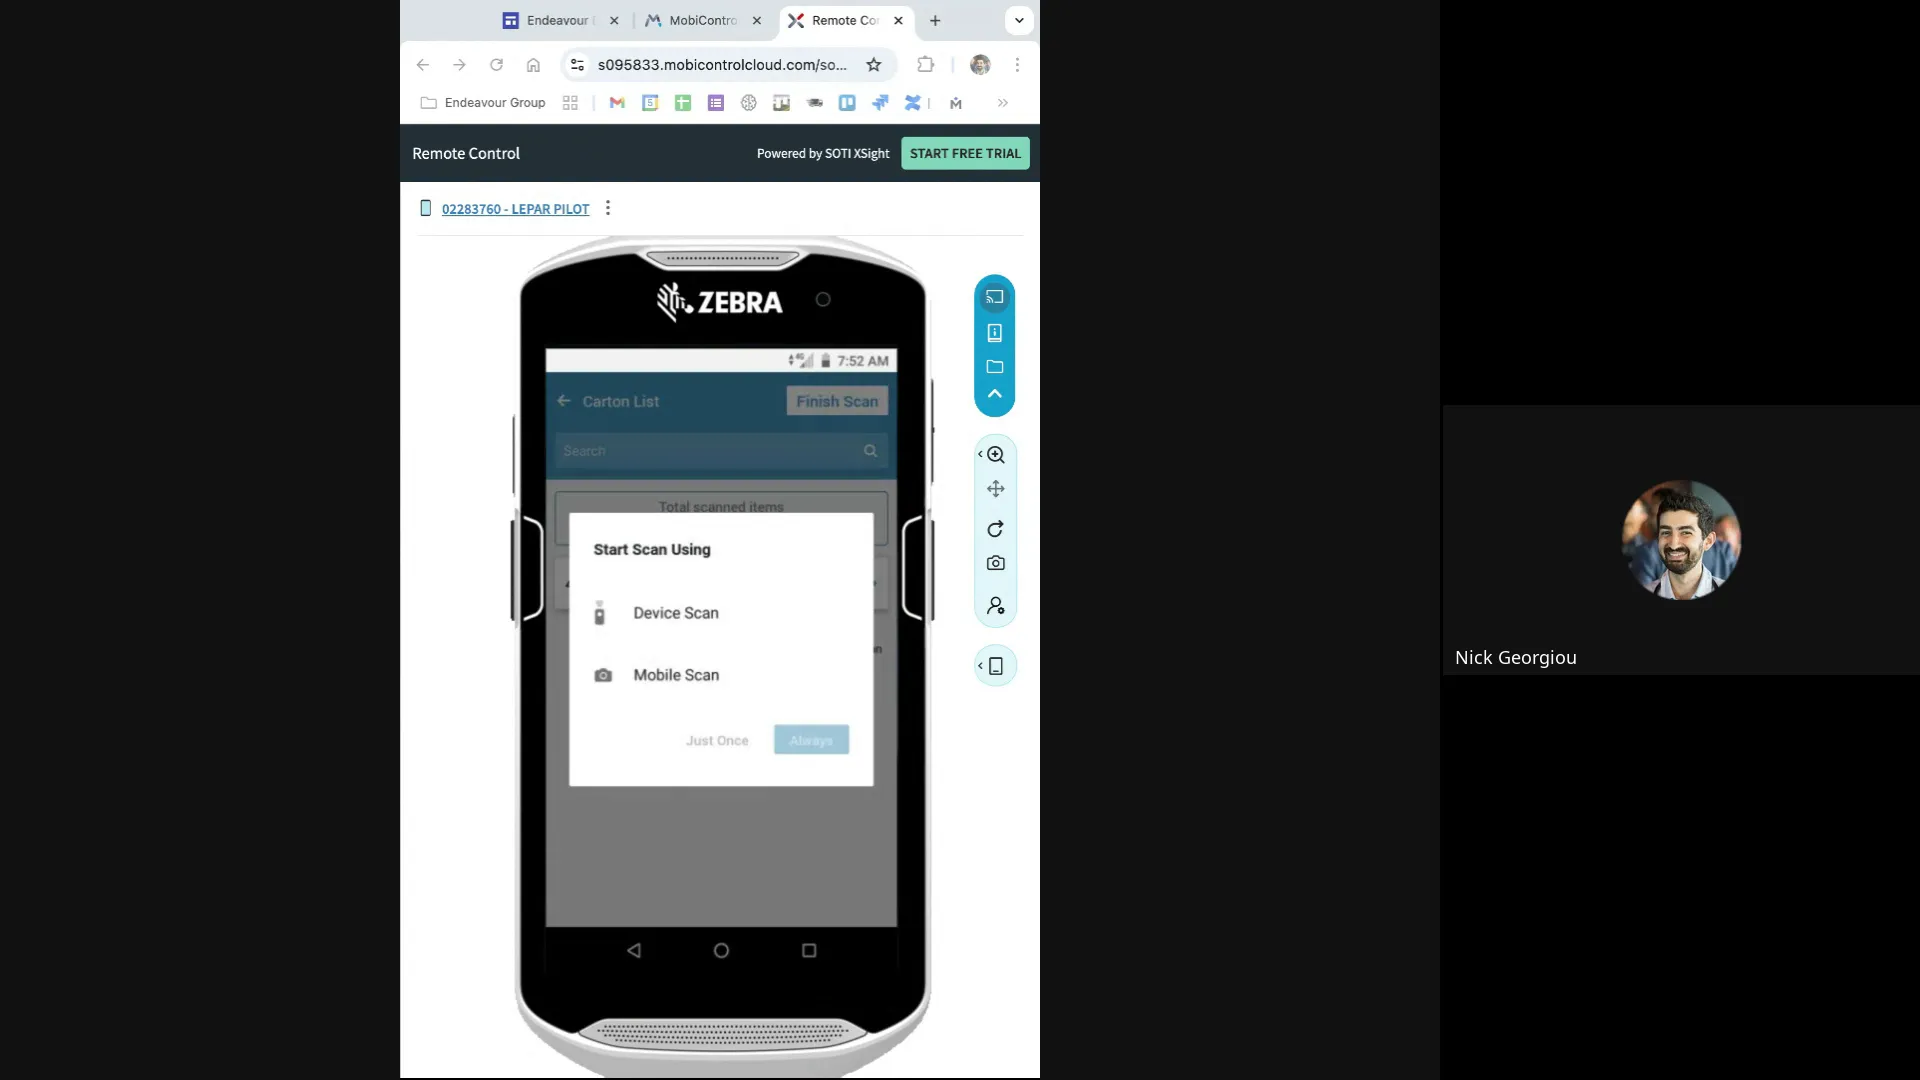
How to Scan Cartons
Fareye offers two scanning options: using the device’s camera or the built-in barcode scanner. The recommended approach is to use the device's scanner for speed and reliability. You simply select all cartons and start scanning each barcode one by one. The system instantly confirms each scanned carton, and if you accidentally scan the same carton twice, it will notify you to prevent errors.
One important operational detail is that consignments can be presented differently depending on your device configuration. Some scanners list each carton separately, while others group multiple cartons under a single consignment line. Regardless of the format, the scanning process remains the same.
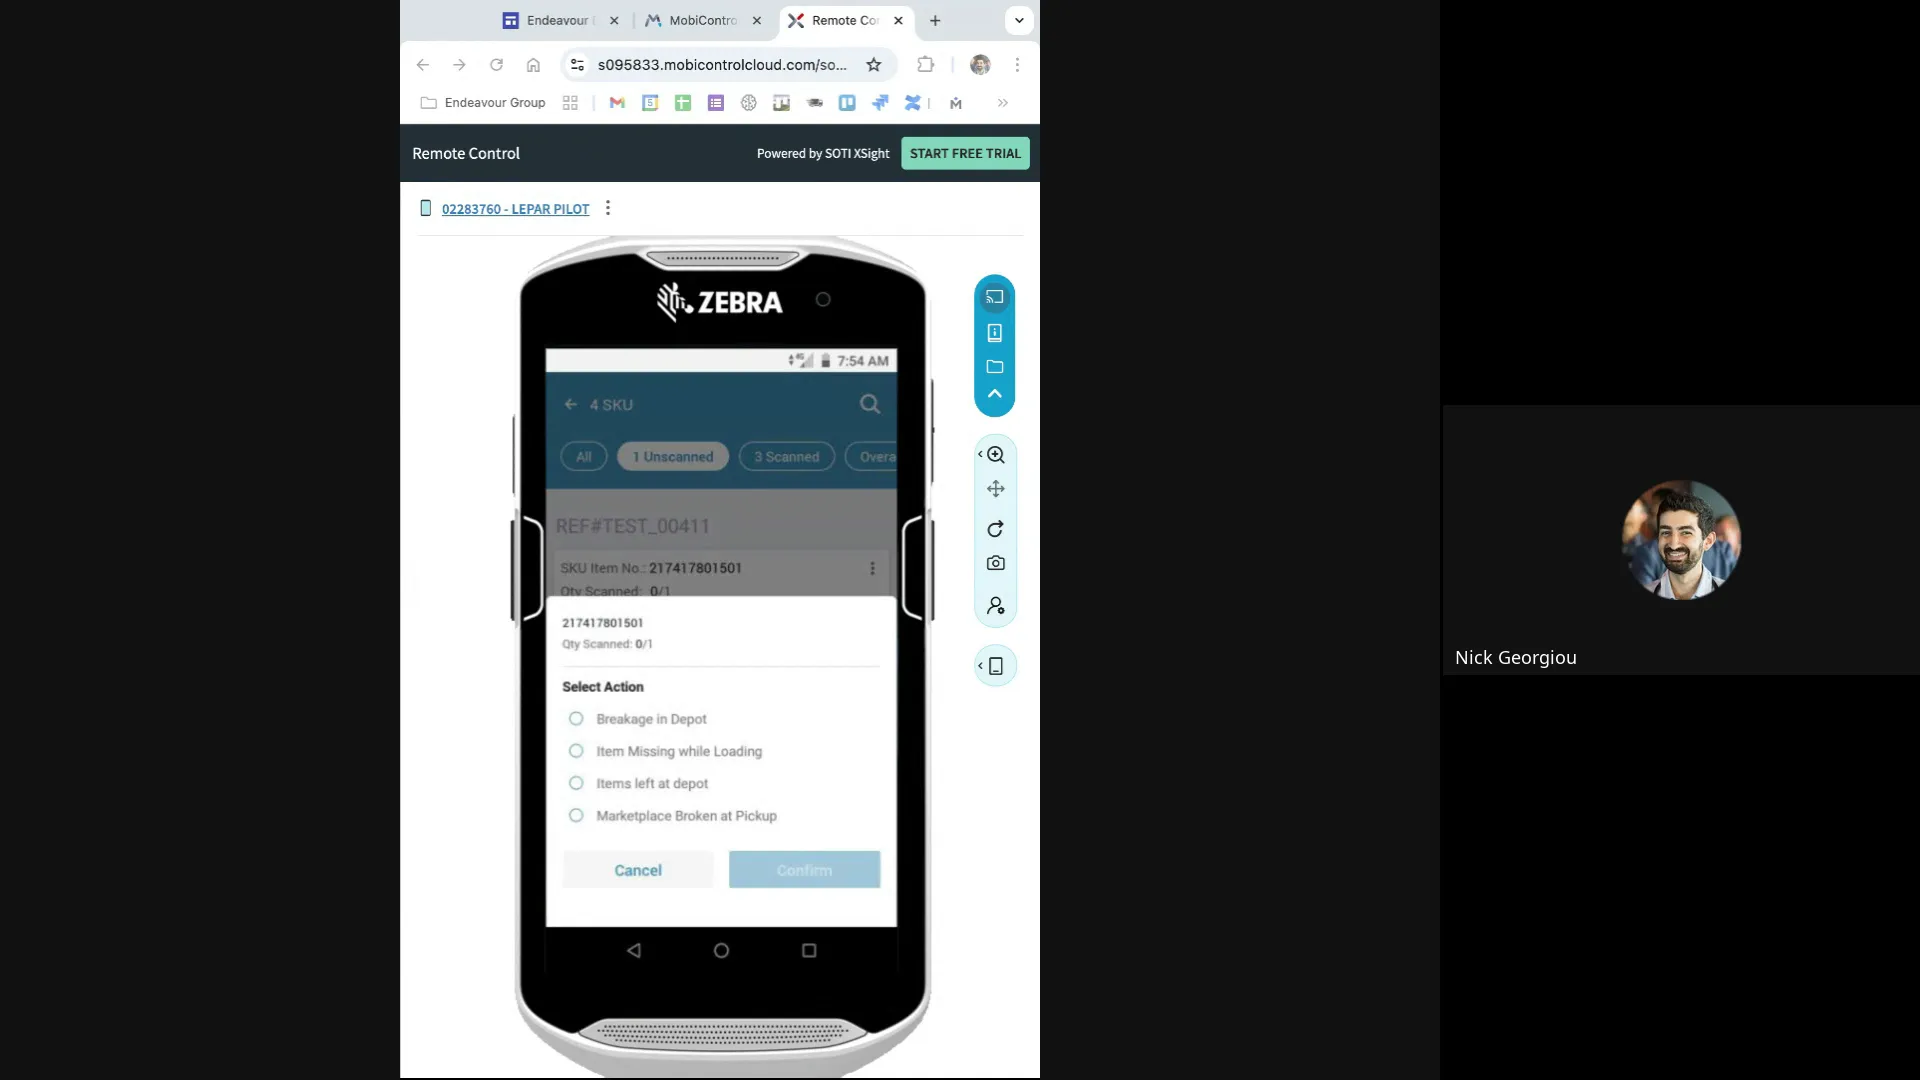
Handling Unscanned or Missing Cartons
During scanning, you may encounter cartons that are missing or cannot be found. Fareye allows you to flag these exceptions directly within the app. By pressing the exception button, you can view unscanned cartons and select a reason for the discrepancy.
Reasons might include:
- Item Missing
- Breakage at Depot
- Collection Failed
Some exceptions require you to take a photo as evidence, such as breakage, while others simply need a confirmation. This feature ensures transparency and accountability for every consignment.
After addressing all unscanned cartons, you can finish the scanning process by sliding to complete. The system will summarize the scanned, unscanned, and exception cartons, allowing you to confirm your load accuracy before moving on.
Completing the Loading Process
Once all consignments are scanned and exceptions handled, the next step is to complete the loading session. This involves pressing the Finish Loading button and accepting a disclaimer confirming that the loading is complete.
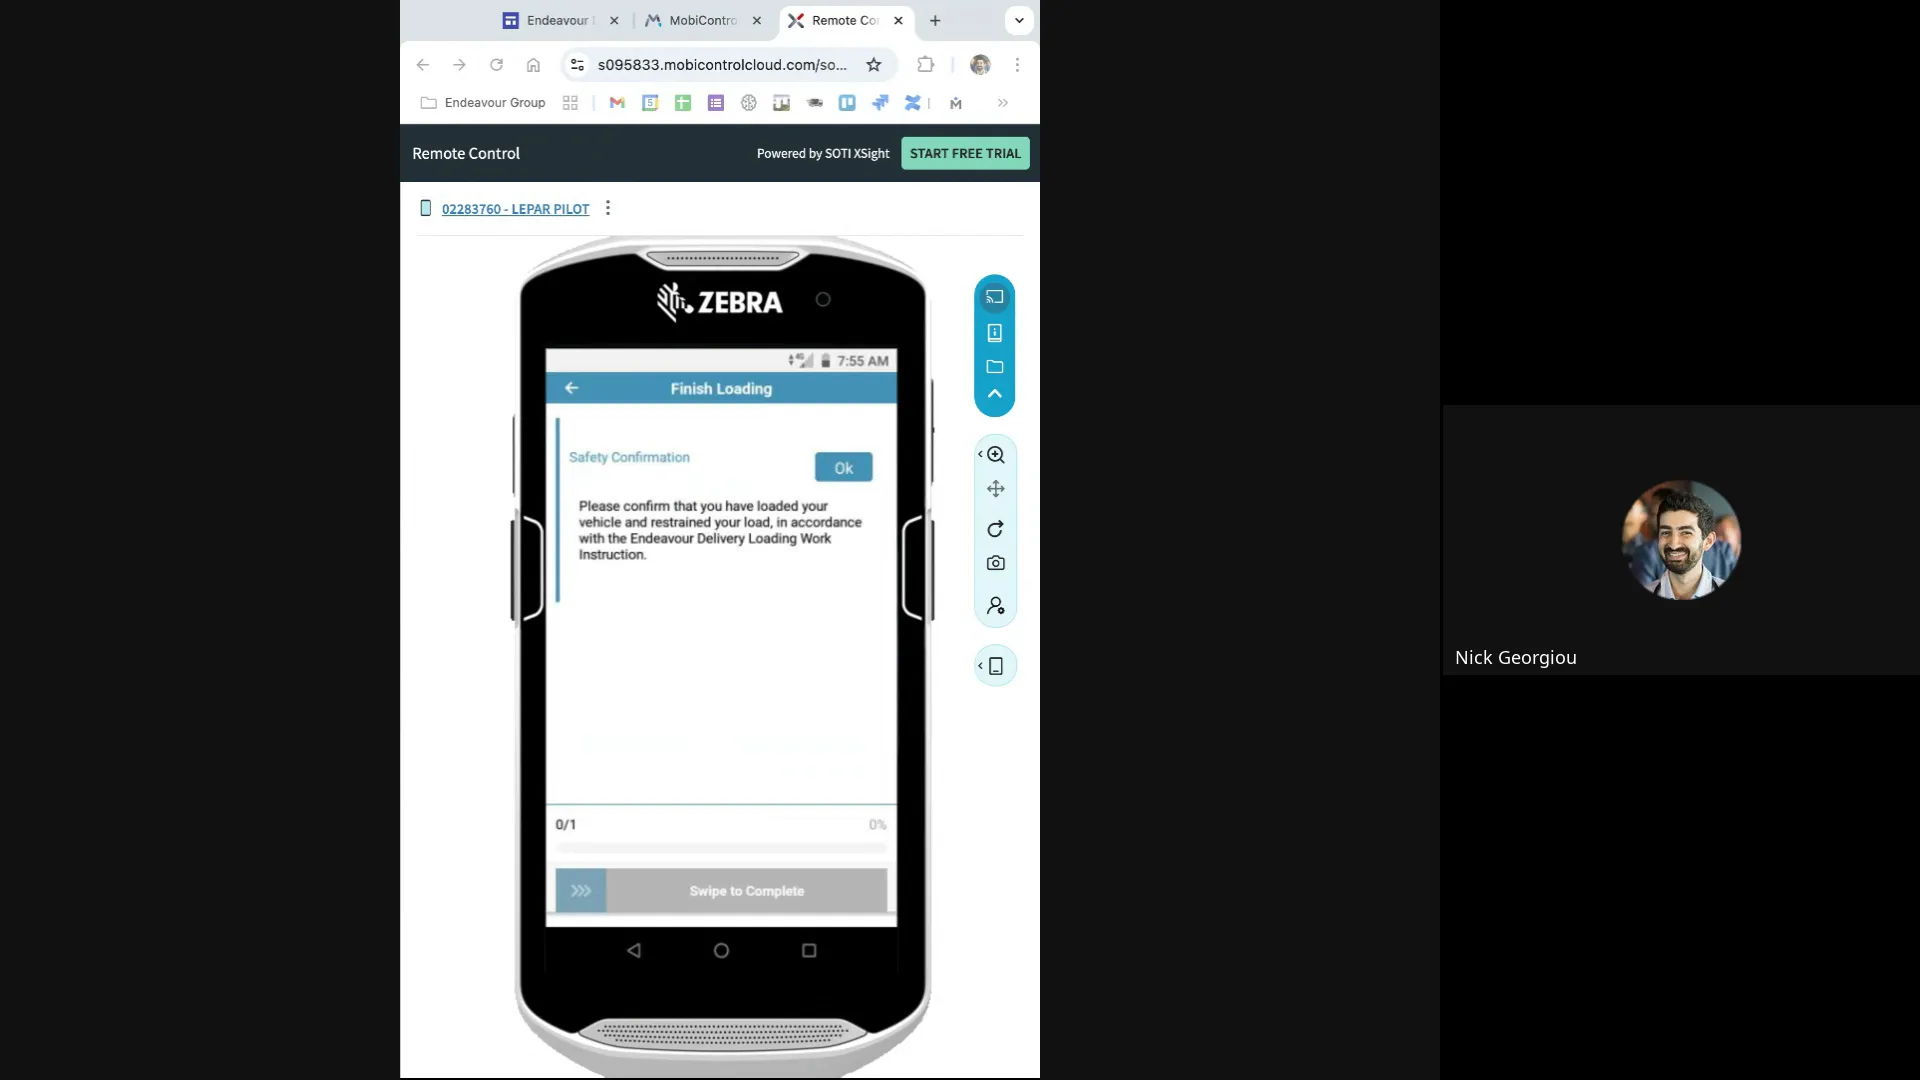
It’s recommended to go through the flow smoothly without jumping back and forth to avoid confusion. Practicing the process helps build confidence and efficiency. Once loading is finished, the system updates your manifest, and you are ready to start deliveries.
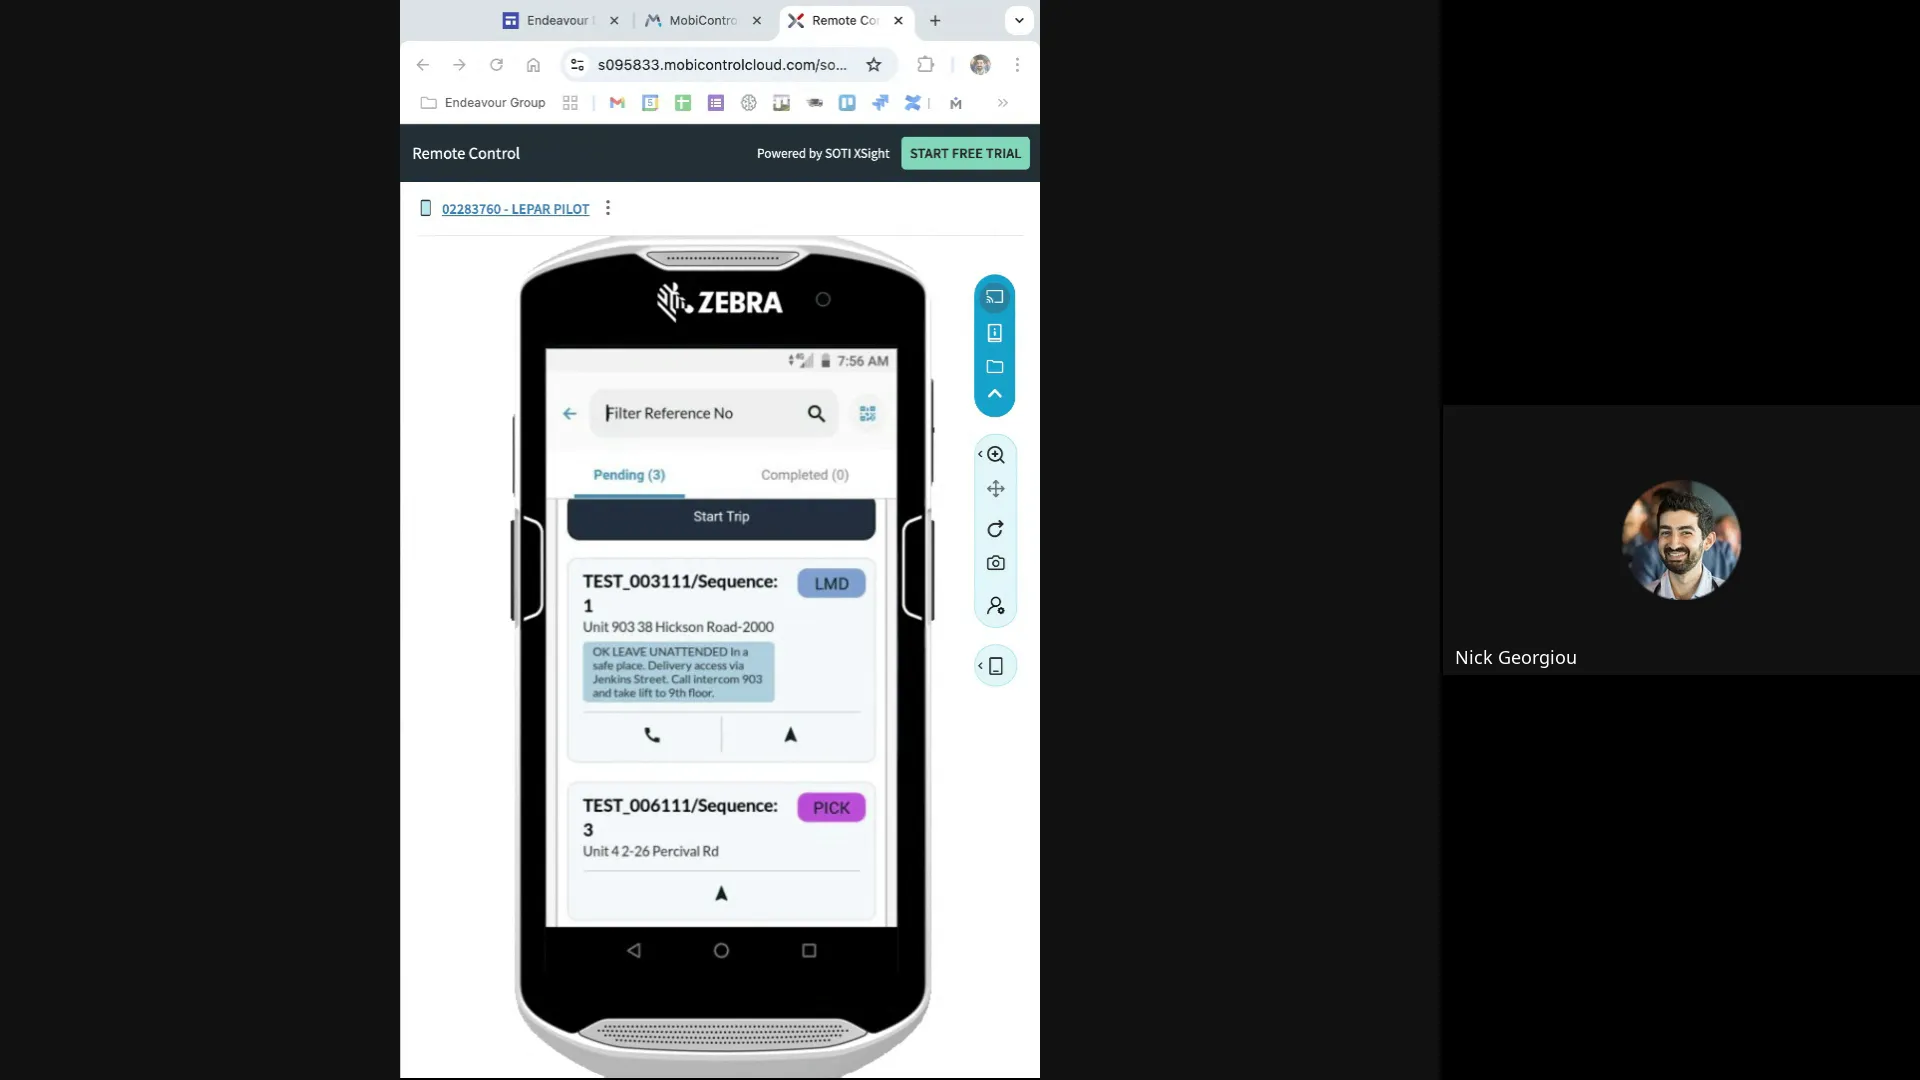
Managing Deliveries in the Last Mile Tab
The Last Mile tab is where you execute your deliveries after loading. Unlike the Loading tab where each card represents a consignment, in Last Mile, each card represents a stop, which can include multiple consignments.
Starting Your Delivery Run
Before beginning deliveries, you must press the Start button for the run. This step is optional and can be used for capturing odometer readings or distance traveled, though many drivers skip this.
The deliveries are arranged in sequence, but you can change the order if needed during the run. However, route changes cannot be made before the day starts since routes are managed in a separate system.
Delivery Details and Actions
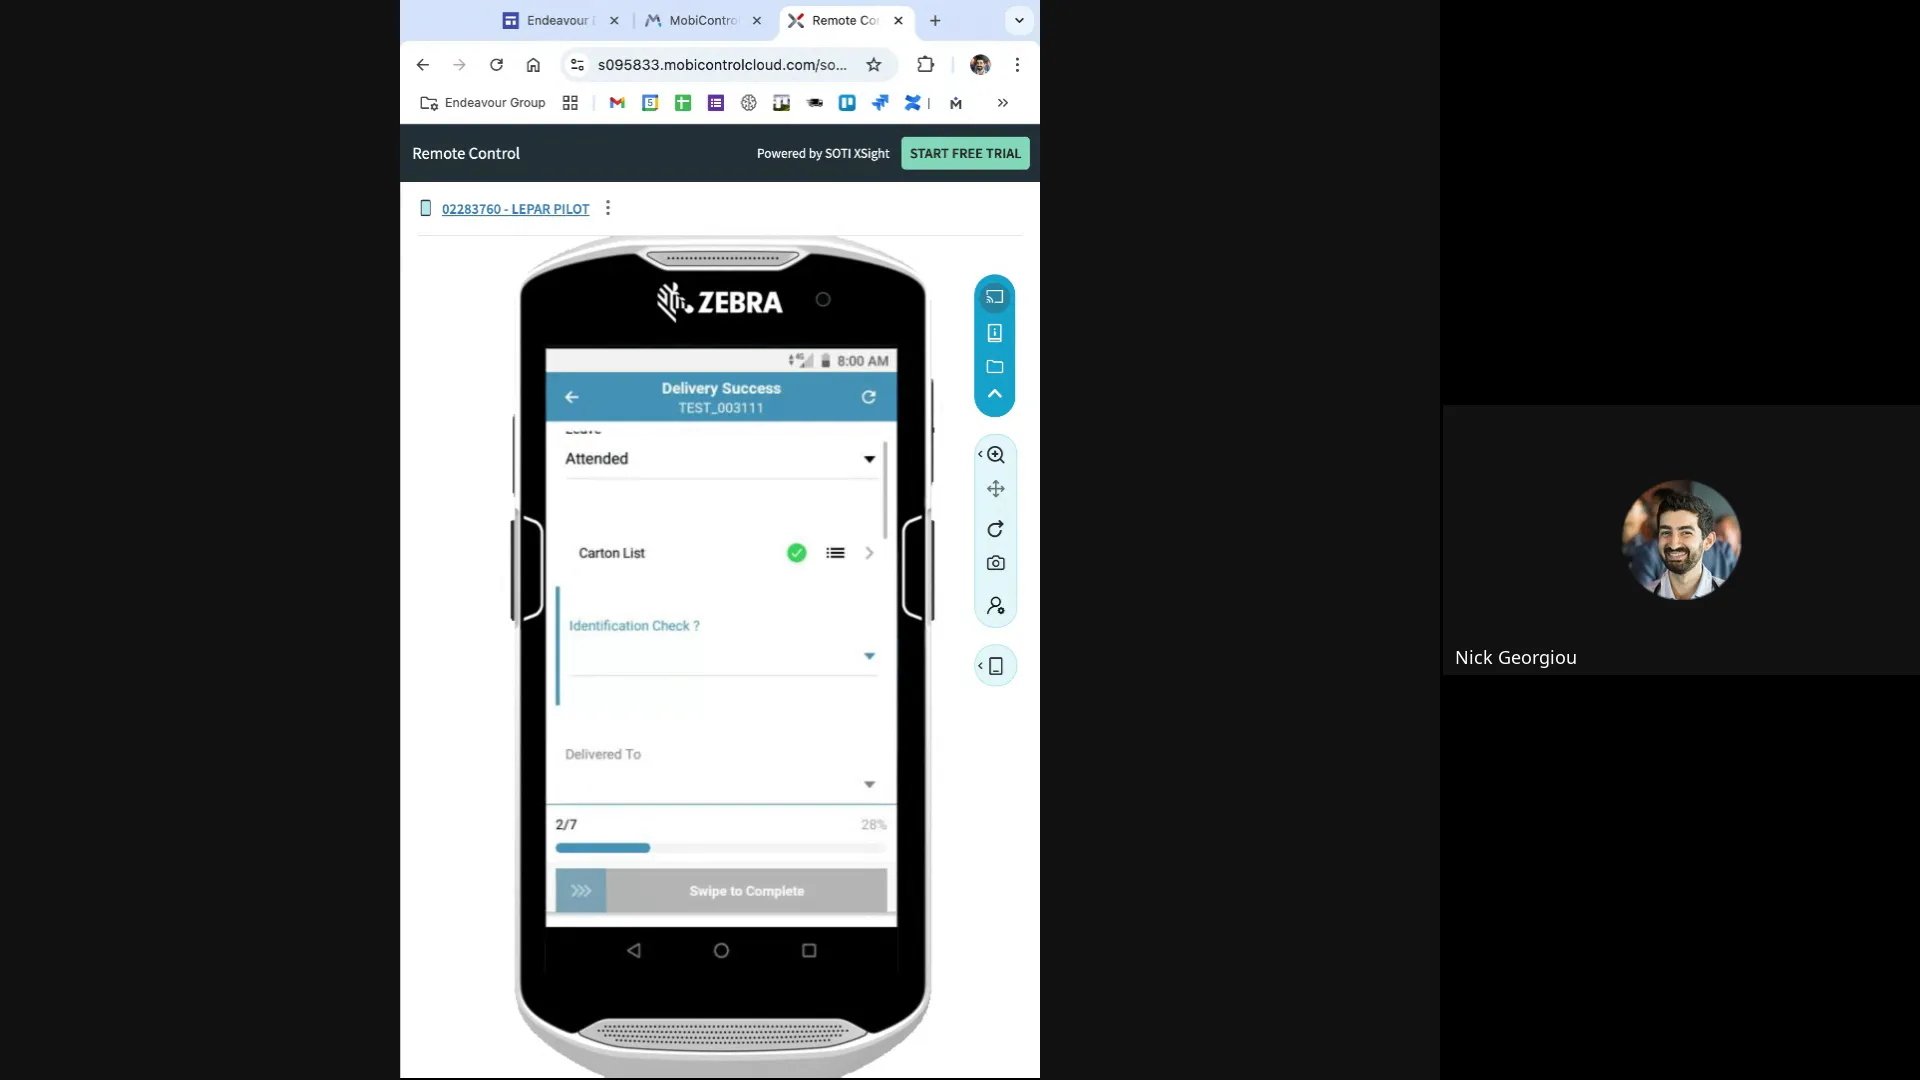
At each stop, you can view special instructions and details for the consignments. You can mark each delivery as either Success or Fail:
- Success: Requires scanning the cartons and completing identification checks.
- Fail: No scanning required; you simply mark the delivery as failed.
Identification and Signature Capture
When marking a delivery as successful, you’ll be prompted to scan the cartons again to confirm delivery. The system also supports identification checks, typically requiring an ID with a number greater than 25 characters.
Delivery can be made to the consignee, security guard, or another authorized person. If not delivered to the consignee, you must enter the recipient's name manually. The app allows capturing digital signatures, which can be saved or re-captured as needed.
Handling Delivery Exceptions and Reattempts
If a delivery fails, you can mark it as such and provide a reason. Currently, the system allows only one delivery attempt. If the delivery fails, the consignment must be rescheduled for another day, as reattempts are not supported in the initial rollout.
This limitation is due to technical issues that are being addressed. Meanwhile, drivers can leave a delivery pending without marking it as failed, allowing reattempts within the same run.
Pickup Process: Confirming and Handling Failures
Pickups follow a similar workflow to deliveries. In the Pickup tab, you can confirm successful pickups or mark them as failed with appropriate reasons.
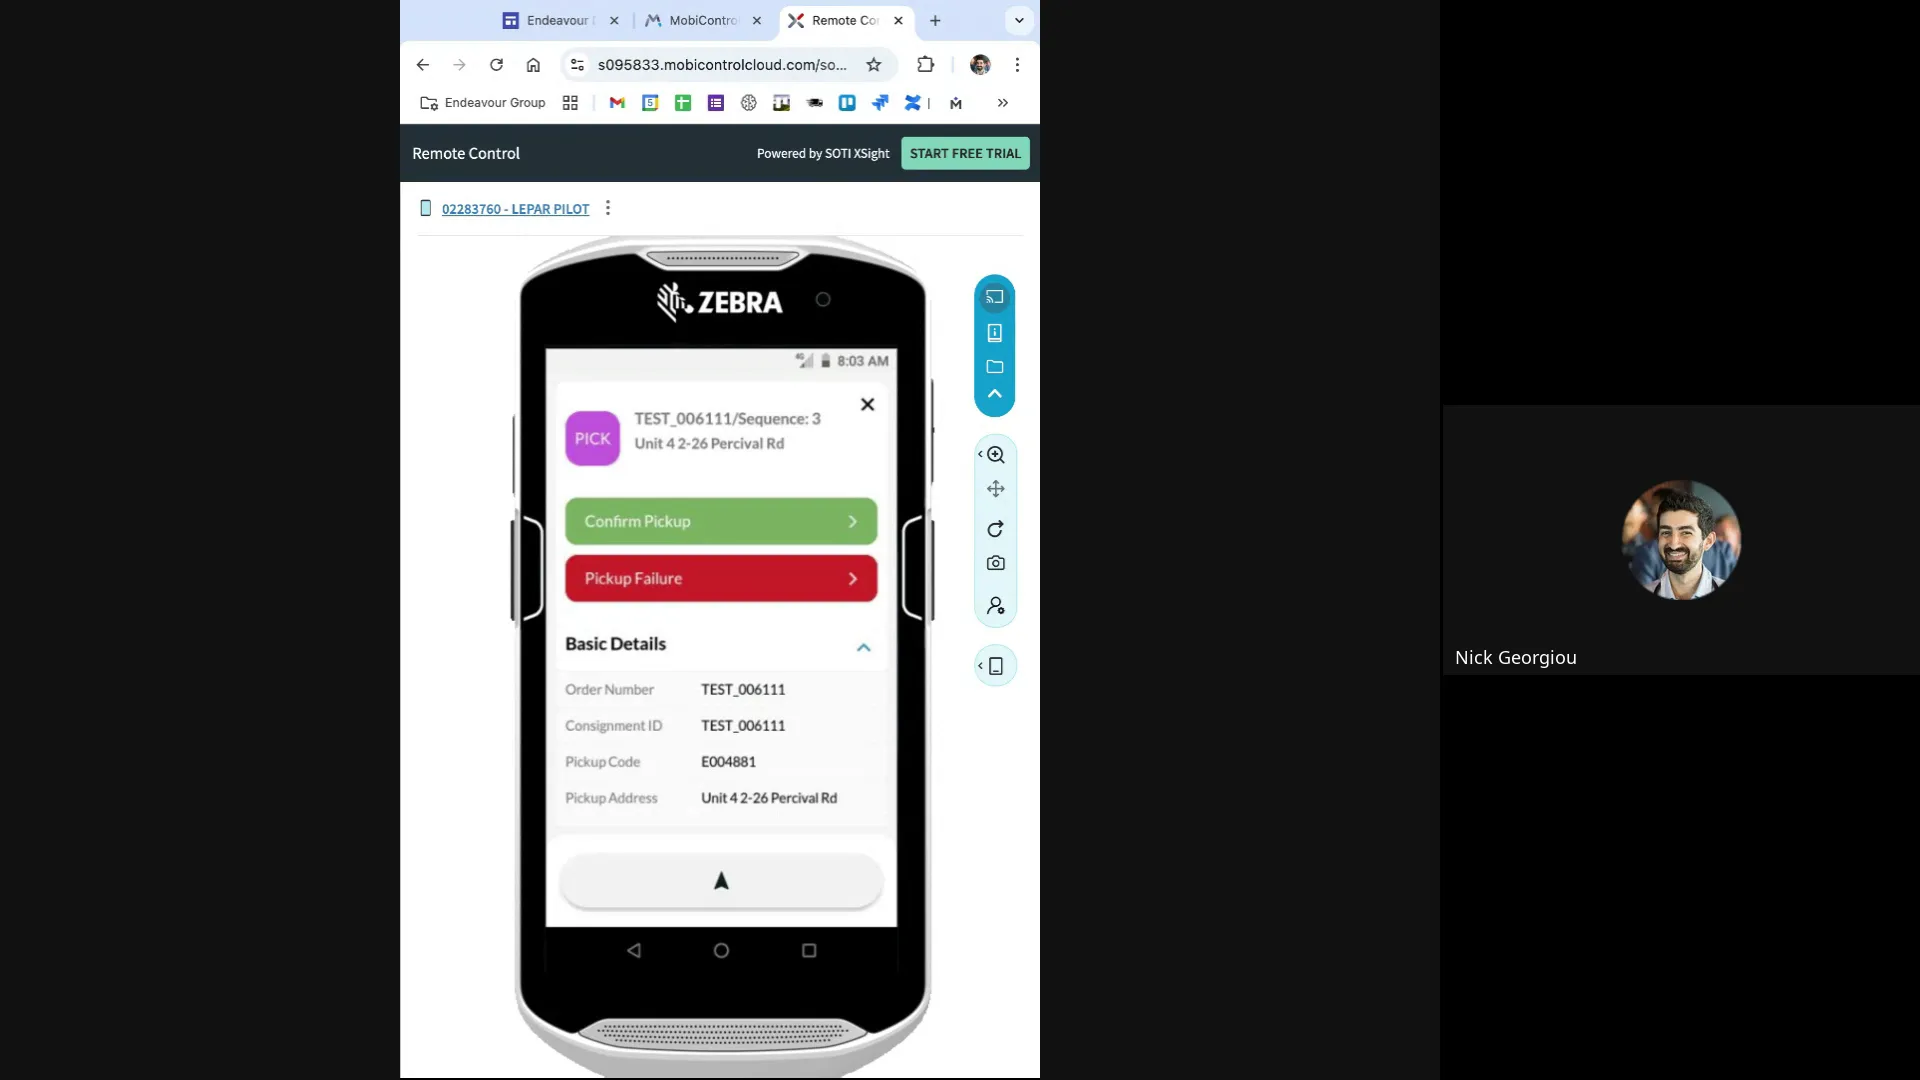
Scanning Picked Up Cartons
When confirming a pickup, scan each carton to verify it has been collected. If you encounter missing or damaged items, you can flag exceptions and, if required, take photos as evidence.
It’s important to note that breakage with the driver is not applicable during pickup since the items are not yet in your possession. Breakage claims apply if damage occurs after loading or during transit.
Handling Pickup Failures
If you cannot pick up all items, mark the failure and select a reason. Some reasons require photographic evidence, while others do not. This process ensures clear communication and documentation for each pickup attempt.
Ending Your Trip and Finalizing the Day
After completing all deliveries and pickups, you must end your trip to finalize the day’s work. The End Trip function confirms that there are no pending consignments left to scan or exceptions to resolve.
If any consignments remain pending, the system will prevent you from ending the trip until all are scanned or properly exceptioned. This feature guarantees completeness and accuracy.
Best Practices and Common Challenges
Managing Missing or Unscanned Cartons
A recurring challenge is handling cartons that are missing or unscanned during loading or delivery. Ideally, drivers should flag missing cartons as soon as they notice them rather than at the end of the run. This approach prevents confusion and reduces the risk of appearing careless or dishonest.
Drivers have different preferences: some prefer to scan everything first and then address missing cartons, while others flag issues immediately. Fareye is exploring ways to optimize this workflow to balance efficiency and accuracy.
Reducing Excessive Swiping and Navigation
Feedback from users indicates that navigating through multiple screens and swiping can be cumbersome. There are ongoing discussions about reducing unnecessary clicks and streamlining the interface to make the process smoother for drivers.
Handling Route and Sequence Changes
While routes are fixed before the start of the day, drivers can adjust the delivery sequence during the run based on practical considerations. This flexibility helps accommodate real-world conditions such as traffic or priority deliveries.
Pickup of Non-Manifested Items
Currently, drivers cannot pick up items not listed on their manifest. These items must be scheduled for pickup on a later date. This restriction helps maintain accurate inventory and tracking.
Frequently Asked Questions (FAQ)
Q: How often do I need to configure the Fareye device for country selection?
A: The country selection is a one-time setup during the initial device configuration. Once set, you won't need to do it again.
Q: Can I change my delivery route before starting my run?
A: Routes are managed in a separate system and cannot be changed once assigned for the day. However, you can change the delivery sequence during your run.
Q: What should I do if a carton is missing during loading or delivery?
A: You should flag the missing carton immediately using the exception feature in the app, selecting the appropriate reason. This helps maintain transparency and prevents confusion later.
Q: Is it mandatory to scan all cartons during pickup and delivery?
A: Yes, scanning each carton ensures accurate tracking and proof of handling. The system will not allow you to complete loading or end your trip if cartons remain unscanned without proper exceptions.
Q: Can I attempt a failed delivery more than once?
A: Currently, only one delivery attempt is allowed. If a delivery fails, it must be rescheduled for another day. Reattempt functionality is expected in future updates.
Q: What happens if I pick up extra items not on my manifest?
A: Picking up extra items not on your manifest is not allowed in the current system. These items should be handled in subsequent pickups when they appear on the manifest.
Q: How do I capture signatures and identification during delivery?
A: The app allows capturing digital signatures and scanning identification documents as part of the delivery confirmation process. You can save or re-capture signatures as needed.
Conclusion
The Fareye system represents a significant advancement in logistics management, offering drivers and dispatchers a robust platform for managing consignments, scanning packages, and documenting delivery and pickup activities. Mastering the system requires understanding the workflow from device setup through loading, scanning, deliveries, pickups, and trip completion.
By following the best practices outlined in this guide, drivers can improve efficiency, reduce errors, and provide better service to customers. It’s important to stay informed about system updates, as features such as reattempting failed deliveries and enhanced scanning workflows will continue to evolve.
Remember, the key to success with Fareye is a combination of accurate scanning, timely exception handling, and clear communication. With these principles, you can confidently navigate your daily routes and contribute to a seamless logistics operation.